Wednesday, October 3, 2012

Week 42: Recipe #2--Paula Deen's Baked Spaghetti

This recipe comes from Paula Deen's website (see link below).  I have quite a few recipes similar to this one on this blog, but I love to try new ones because spaghetti is always a hit with this family.  This did take a bit of time to make, so it's a good weekend recipe.  It is not difficult, just time-consuming.  Also, I didn't use the Paula Deen's Seasoned Salt--I just kind of created my own with what I had in the spice cupboard.  Other than that, I followed it pretty closely.  It turned out well; lots of flavor and the husband and kids ate it up.  I served it with a caesar salad and some fruit.  Makes 10 servings.
You'll Need:
  • 8 oz. uncooked angel hair pasta
  • 1/4 c. chopped fresh parsley
  • 1 1/2 lbs. ground beef
  • 1 1/2 tsp. Paula Deen's House Seasoning (To make a batch of this, mix 1 c. salt, 1/4 c. black pepper, and 1/4 c. garlic powder)
  • 1 1/2 tsp. sugar
  • 1 1/2 tsp. Paula Deen's Seasoned Salt
  • 1 1/2 tsp. Italian seasoning
  • 2 c. tomato sauce
  • 1 c. water
  • 2 c. canned diced tomatoes
  • 2 cloves garlic, chopped
  • 1/2 c. diced green bell pepper
  • 1/2 c. diced onion
  • 1 c. grated cheddar cheese
  • 1 c. monterey jack cheese
  • 2 small bay leaves
Preparation:
  1. Preheat oven to 350 degrees.
  2. In a stockpot, combine the tomatoes, tomato sauce, water, onions, peppers, garlic, parsley, seasoning mixtures, sugar, and bay leaves.  Bring to a boil over high heat, and then reduce the heat and let simmer, covered, for 1 hour.
  3. Crumble the ground beef in a large skillet.  Cook over med-high heat until fully cooked, with no pink color remaining.  Drain the fat from the meat, and then add the ground beef to the stockpot.  Simmer for 20 more minutes.
  4. Cook the pasta according to the package directions. 
  5. Cover the bottom of a 13 x 9 inch pan with sauce.  Add a layer of pasta and then a little less than 1/2 of the cheese; repeat the layers, ending with the sauce.  Bake in the oven for 30 minutes.
  6. Tope the casserole with the remaining cheeses, return it to the oven, and continue to cook until the cheese is melted and bubbly, about 5 more minutes.  Cut into squares before serving.
Recipe and link:  http://www.pauladeen.com/recipes/print_view/210/

Week 42: Recipe #1--Grilled Black Bean and Cheese Quesadillas

I found this recipe on Pinterest, and it comes from a site called Real Mom Kitchen (see link below).  These were destined to be a win for my kiddos, who LOVE black beans and quesadillas.  Never thought to put them together, and they were great!  Plus, this was a super easy recipe to make on a busy weeknight.  I followed the recipe exactly and served it with a side of homemade guacamole and some applesauce.  Makes 5 large quesadillas (it calls for 10 tortillas), so I halved the following ingredients for my family of four.
You'll Need:
  • 2 (15 oz.) cans of black beans, drained
  • 1 c. salsa
  • 1 tsp. cumin
  • 2 c. shredded colby-jack cheese
  • 10 (8-in.) flour tortillas
  • optional garnishes:  sour cream, salsa, or guacamole 
Preparation:
  1. Preheat your grill to medium heat.
  2. In a bowl, add 1 can of your black beans and mash with a potato masher until beans are well mashed.
  3. Add the remaining 1 can of beans along with the salsa and cumin to the mashed beans.  Stir until well combined.
  4. Divide the bean mixture between 5 of the tortillas.  Spread evenly over the tortillas.
  5. Sprinkle about 1/3 cup of the shredded cheese over the beans on each tortilla.
  6. Top with remaining tortillas and place on the grill.  Cook about 2 minutes per side until crisp and golden.
  7. Cut into wedges and serve with salsa, sour cream, or guacamole.
Recipe and link:  http://realmomkitchen.com/12300/grilled-black-bean-and-cheese-quesadillas/

Thursday, September 27, 2012

Week 41: Recipe #5--Beef and Bean Taco Casserole

I found this recipe on Pinterest, and it comes from a site called Recipe.com (see link below).  It was easy to throw together, and it was pretty good.  My husband especially liked it.  The meat was a bit spicy for my 4 year old, but the little one ate hers up.  They both loved that there were chips in it.  I served this meal with Mexican rice and applesauce.  Makes 5 servings.
You'll Need:
  • 1 lb. ground beef
  • 1 can (16 oz.) refried beans
  • 1 jar (16 oz.) thick 'n chunky salsa
  • 1 pkg. taco seasoning mix
  • 2 1/2 c. coarsely broken tortilla chips
  • 1/2 med. green bell pepper, chopped
  • 4 med. green onions, sliced
  • 2 med. tomatoes, chopped
  • 1 c. shredded cheddar cheese
  • 1/4 c. sliced ripe olives
  • 1 c. shredded lettuce
Preparation:
  1. Preheat oven to 350 degrees.  In a skillet, cook beef over medium-high heat 5 to 7 minutes, stirring occasionally, until thoroughly cooked; drain.  Stir in refried beans, salsa, and taco seasoning mix.  Reduce heat to medium.  Heat to boiling, stirring occasionally.
  2. In ungreased 2-qt. casserole dish, place 2 cups of the broken tortilla chips.  Top evenly with beef mixture.  Sprinkle with bell pepper, onions, 1 cup of the tomato, the cheese, and olives.
  3. Bake uncovered for 20-30 minutes or until hot and bubbly and cheese is melted.  Top baked casserole with lettuce, remaining 1/2 cup tomato, and remaining 1/2 cup tortilla chips.
Recipe and link:  http://www.recipe.com/beef-and-bean-taco-casserole/

Week 41: Recipe #4--Chicken Alfredo Roll-Ups

Yummmmm.....these were good!  Probably not the best if you're counting points, calories, or carbs, but they were GOOD.  And you can splurge every now and again, right?  This recipe comes from a blog called Mmm...Cafe (see link below).  I followed the recipe exactly, as well as making the homemade alfredo sauce.  Because of that, and having to cook the chicken (I'd get a rotisserie next time), this recipe was a bit time-consuming to make.  However, if you already had cooked chicken at the ready, and you used store-bought alfredo sauce, or had some pre-made, this would come together pretty quickly.  I can say, I wouldn't use store-bought after this sauce.  It was really tasty.  Loved it.  The whole meal was a huge hit with the husband and kids as well.  I served these roll-ups with green beans and applesauce.  Makes 9 roll-ups.  **The original recipe says that 3 roll-ups are a serving, so there are 3 servings.  However, my husband and I were satisfied with 1 roll-up each...I could maybe eat 2, but 3 would be too much.
You'll Need:
  • 9 lasagna noodles
  • 2 c. cooked, shredded chicken
  • oregano
  • garlic salt
  • 3 c. shredded mozzarella
  • 1/2 c. butter
  • 2 oz. cream cheese
  • 2 c. heavy cream
  • 2 tsp. garlic powder
  • 1/2 tsp. fresh minced garlic
  • salt and freshly ground black pepper
  • 1/2 tsp. dried oregano
  • 2/3 c. parmesan cheese
Preparation:
  1. For the sauce:  In a medium to large saucepan, melt the butter over medium heat.  Add fresh minced garlic and cook for 1 minute, or until fragrant.  Add the cream cheese and whisk to smooth and melted.  Whisk in the heavy cream.
  2. Season with the garlic powder, salt, and pepper.  Bring to a simmer and whisk frequently until sauce thickens, around 15 minutes.  Stir in the cheese and when melted, remove from heat and set aside.
  3. Preheat the oven to 350 degrees.  Spray an 8 x 8 pan with nonstick spray and pour in 1/2 cup alfredo sauce, or just enough to cover the bottom of the pan.  Boil 8-10 cups water in a large pan, cook lasagna noodles until al dente.  Drain the noodles with cold water to prevent them from sticking to each other.  Then, lay out each noodle individually and blot dry with a paper towel.
  4. Spread about 2 tablespoons alfredo sauce over each noodle.  Sprinkle oregano and garlic salt on top of the sauce.  Take 1/9 of the shredded chicken and spread it out evenly over each noodle.  Add approximately 3 tablespoons cheese.  To roll up, start at one end and roll the noodle over the toppings.  You will need to lift up the noodle a little to prevent squishing out the inside ingredients while rolling.
  5. Place the roll-ups in the pan, one by one, seam-side down so they don't come undone.  Once they are all in the pan, pour the remaining alfredo sauce over the top.  Top with remaining cheese.  Bake for about 30 minutes., or until the cheese is completely melted on top.
Recipe and link:  http://mmmcafe.blogspot.com/2012/01/chicken-alfredo-roll-ups.html
Sunday, September 23, 2012

Week 41: Recipe #3--Chile Colorado Burritos (Crockpot Recipe)

I first saw this recipe on Pinterest, and it comes from a blog called Food Pusher (see link below).  These burritos turned out really well.  The best part was, there weren't that many ingredients, and it was literally just throwing 3 things into the crockpot in the morning.  Then it was super easy to put the burritos together that evening.  Great flavor, and we all loved them.  I served them with a salad and some homemade applesauce.  Makes 5-7 burritos.
You'll Need:
  • 1 1/2 to 2 lbs. stew meat or other beef, cubed
  • 1 large can mild enchilada sauce, at least 19 oz.
  • 2 beef bouillon cubes (I used the granules, 2 tsp.)
  • 1/2 can refried beans
  • 5-7 burrito size flour tortillas
  • 1 c. shredded cheddar cheese
Preparation:
  1. Put beef, bouillon, and enchilada sauce into a crockpot and cook on low for 7-8 hours, or on high for 3-4 hours, until meat is very tender.  
  2. When beef is done (flakes off when stirred), taste and add more salt, if desired (I thought it was fine without adding salt).  Heat up the beans in the microwave, and put your oven on broil.  On a tortilla, place 1/2 cup of the meat, drained by using a slotted spoon, and a spoonful or two of beans.  Roll into a burrito and place in a baking dish.  Repeat with the other tortillas until you run out of the meat (I was able to make 5 burritos).  Pour some of the remaining enchilada sauce form the crockpot over the burritos to cover them.  Sprinkle with the cheddar cheese.  Broil until cheese is bubbly, about 2-4 minutes.
Recipe and link:  http://food-pusher.blogspot.com/2010/08/chile-colorado-burritos.html

Saturday, September 22, 2012

Week 41: Recipe #2--White Pita Pizzas

Yum!  These were really good pizzas, and they took NO time at all to throw together.  Super easy.  I found them on Pinterest, and they come from a site called Prevention (see link below).  We all loved these pizzas, and I especially love anything with pesto.  Next time I might throw a tomato slice or two on top, but these were perfect just the way they were.  I served these with a green salad and fruit.  Great  meal for a busy weeknight!  Makes 4 servings (although I doubled this recipe because that didn't seem like enough--doubling it was perfect).
You'll Need:
  • 2 whole wheat pitas, split horizontally into 2 halves
  • 1 c. fat-free ricotta cheese
  • 3/4 c. shredded reduced-fat mozzarella cheese
  • 1/4 c. grated parmesan cheese
  • 1 clove garlic, minced
  • 4 Tblsp. pesto
Preparation:
  1. Preheat the oven to 425 degrees.  Coat a baking sheet with cooking spray.
  2. Place the pita halves on the prepared baking sheet and bake for 4 minutes.  Remove from the oven and cool for 5 minutes.
  3. Meanwhile, combine the ricotta, mozzarella, parmesan, and garlic in a bowl.  Spread 1/4 over each pita.  Spread 1 tablespoon of the pesto over the cheese on each pita.  Bake for 6 to 7 minutes or until the cheese is melted.
Recipe and link:  http://recipes.prevention.com/Recipe/white-pita-pizzas.aspx

Week 41: Recipe #1--Samosadillas

I love samosas and quesadillas, so this recipe was a win-win from the beginning.  I found this recipe on a site called Go Dairy Free (see link below).  My girls are huge quesadilla fans, and even though there was no cheese in these samosadillas, they still loved them!  It was a great way to get them to eat some veggies.  I was worried it might be too spicy for my oldest, but she didn't seem to notice.  They definitely need a chutney for dipping, which I didn't have on hand (nor did I have time to throw one together).  I did, however, have curry ketchup--so I used that.  I will definitely be making these again.  I served these with fresh fruit.  Makes 4 servings.
You'll Need:
  • 1 1/2 c. cooked diced potatoes
  • 1/2 c. thawed frozen green peas
  • 1/4 c. canned hot or mild diced green chiles, drained (I used mild)
  • 2 Tblsp. raisins
  • 1 Tblsp. soy sauce
  • 1 Tblsp. curry powder or paste (I used powder)
  • 2 tsp. ground coriander
  • 1/2 tsp. ground cumin
  • 1/2 tsp. chili powder
  • salt and black pepper, to taste
  • 4 large flour tortillas
Preparation:
  1. Mash the potatoes in a saucepan.  Add the peas, chiles, raisins, soy sauce, curry powder, coriander, cumin, chili powder, and salt and pepper to taste.  Mix well and heat over medium heat until hot, stirring as needed, 4 to 5 minutes.
  2. Cut the tortillas into quarters.  Spoon about 2 tablespoons of the filling in the center of each tortilla piece.  Fold one side over the filling and press lightly to flatten.  The filling will hold the tortilla in place.  Set aside.  Repeat with the remaining ingredients.
  3. Arrange the samosadillas in a nonstick skillet over medium heat.  Cook until lightly browned and heated through, turning once, 6 to 8 minutes total.  Serve hot with chutney.
Recipe and link:  http://www.godairyfree.org/news/nutrition-headlines/samosadillas-in-the-snow

Tuesday, September 18, 2012

Week 40: Recipe #5--Beef, Snap Pea, and Asparagus Stir-Fry

This recipe comes from Martha Stewart (see link below).  It was really good!  And pretty easy to throw together, too.  Literally took about 20 minutes to make.  The girls loved the meat; tried the veggies, but they didn't eat them.  I loved the whole thing.  The meat and veggies were flavorful, and I loved that the  veggies were fresh, not frozen.  A lot of stir-fry recipes I've made have frozen ingredients, so that was nice.  I left out the lemon because I didn't have one, but it was still delicious.  I also used dried basil...couldn't tell.  I served this entree over rice with some fruit on the side.  Makes 4 servings.

You'll Need:

  • 1 Tblsp. soy sauce
  • 1 tsp. rice vinegar
  • 1 tsp. sugar
  • 3/4 lb. boneless New York strip steak, thinly sliced
  • coarse salt
  • 1 Tblsp. vegetable oil
  • 1 bunch asparagus (14 ounces), trimmed, cut into 2-inch lengths
  • 6 oz. snap peas
  • 1 garlic clove, minced
  • 1 Tblsp. peeled minced fresh ginger
  • 1 tsp. fresh lemon juice, plus lemon wedges for serving (optional)
  • 2 Tblsp. torn fresh basil leaves
  • cooked rice

Preparation:

  1. In a small bowl, combine soy sauce, vinegar, and sugar. Season steak with salt. In a large skillet or wok, heat oil over high. Cook steak, undisturbed, until brown on one side, 2 minutes (do not overcrowd pan). Flip and cook until cooked through, 30 seconds. Transfer to a bowl.
  2. Add asparagus, snap peas, garlic, and ginger to skillet. Cook, stirring constantly (add a little water if pan gets too dark), until vegetables are crisp-tender, about 4 minutes. Add soy mixture and cook until fragrant, about 10 seconds. Remove skillet from heat and stir in lemon juice and basil. Toss steak with vegetables; serve with rice and lemon wedges if desired.
Recipe and link:  http://www.marthastewart.com/334100/beef-snap-pea-and-asparagus-stir-fry

Sunday, September 16, 2012

Week 40: Recipe #4--Butternut Squash Stuffed Shells with a Lemon Sage Brown Butter Sauce

Oh.  My.  Word.  These were good, and the sauce--even better.  I found these on a blog called Proud Italian Cook (see link below).  This is the perfect fall recipe.  It's not difficult to make, but it is a bit time-consuming.  I chose to make it on the weekend, so that time wasn't as much of an issue.  It took about an hour from start to finish.  These will be on our menu again very soon.  The only downside was that I forgot to add the lemon zest to the stuffing mixture.  I remembered the lemon juice in the sauce, but I think the zest would have made them even better (if that's possible).  I served these shells with green beans and fruit.  Proud Italian Cook says that is makes about a dozen shells, but I was able to make about double that.
You'll Need:
  • medium butternut squash, peeled and chopped (You want about two cups when it's roasted)
  • 1-2 Tblsp. olive oil
  • jumbo pasta shells
  • 2 c. ricotta cheese
  • 1/3 c. parmesan cheese
  • 1 garlic clove, smashed
  • 1/4 c. frozen chopped spinach, thawed, squeezed, and drained
  • 1 egg
  • salt and pepper, to taste
  • grated lemon peel
  • stick of butter
  • 10 sage leaves
Preparation:
  1. Toss chopped squash in olive oil, then roast in the oven for 15-20 minutes at 425 degrees.
  2. Cook pasta shells according to directions.
  3. In a bowl mix the ricotta, parmesan, garlic, spinach, egg, salt and pepper, cooled down squash, and lemon peel.
  4. Stuff the shells with the mixture and place in a buttered baking dish.  Bake for 20-25 minutes at 400 degrees.
  5. While the shells are baking, make a sage brown butter sauce by melting 1 stick of butter in a saute pan until golden brown and bubbly.  Add 10 sage leaves until slightly crisp.  Turn off heat and squeeze in fresh lemon juice.
  6. When the shells are done baking, spoon the warm sage sauce over them and sprinkle them with grated parmesan.  YUM!!!
Recipe and link:  http://prouditaliancook.blogspot.com/2009/10/butternut-squash-stuffed-shells-with.html

Saturday, September 15, 2012

Week 40: Recipe #3--Chicken, Apple, and Potato Skillet

This recipe is another Pinterest find, and it was pretty good.  It comes from a site called Prevention (see link below).  I've never had a brussels sprout before, and they weren't half bad.  My youngest ate this up, and my 4 yo ate everything but the sprouts.  I served this with fresh fruit.  Makes 4 servings.
You'll Need:
  • 1 lb. boneless, skinless chicken breasts, cut into 1/2" cubes
  • 4 tsp. olive oil
  • 3 slices bacon, chopped
  • 1 1/2 c. brussels sprouts, trimmed and quartered
  • 1 med. sweet potato (8 oz.) peeled and cut into 1/2" cubes
  • 1 med. onion, chopped
  • 2 golden delicious apples, peeled, cored, and cut into 3/4" cubes
  • 4 cloves garlic, sliced
  • 1 tsp. chopped fresh thyme or 1/4 tsp. dried (I used dried)
  • 1/4 tsp. ground cinnamon
  • 1 c. chicken broth
Preparation:
  1. Season chicken lightly with salt.  Heat 2 teaspoons of the oil in large nonstick frying pan or cast-iron skillet over medium-high heat.  Add chicken and cook until lightly browned and cooked through, about 5 minutes.  Transfer to a plate.
  2. Return pan to heat and add remaining 2 teaspoons oil.  Stir in bacon and cook until starting to brown, about 2 minutes.  Add brussels sprouts, sweet potato, and onion.  Cook, stirring occasionally, until crisp-tender, about 5 minutes.  Stir in apples, garlic, thyme, and cinnamon.  Cook 3 minutes.  Pour in 1/2 cup of the broth, bring to a boil, and cook until evaporated, about 2 minutes.  Add reserved chicken and remaining 1/2 cup broth.  Season with the salt and black pepper as needed.  Cook until hot, about 2 minutes.
Recipe and link:  http://www.prevention.com/food/cook/heart-healthy-recipes-pork-chops-beef-chili-and-more

Week 40: Recipe #2--Pasta with Sun-Dried Tomatoes & Olives

I found this recipe on Pinterest, and it comes from a site called With Style and Grace (see link below).  I love the flavors in this dish, and the girls ate it up because it was pasta.  My husband swears he doesn't like olives, but I didn't mention there were any in it, and he didn't seem to notice.  Ate it all up!  It was pretty easy to throw together, so I'll definitely be making it again.  I served this with a green salad and fruit.  Makes 2-3 servings, so I doubled it.  Doubling it made enough for all four of us, plus enough for the two of us to half leftovers for lunch the next day.
You'll Need:
  • 1 Tblsp. extra virgin olive oil
  • 1 large garlic clove, minced
  • 1/2 c. onion, chopped
  • 1/3 c. sun-dried tomatoes, chopped
  • 1/4 c. low sodium chicken broth
  • 1/8 c. kalamata olives, sliced and pitted
  • 1/4 c. fresh parsley, chopped (I used dried)
  • 4 oz. pasta shells
  • 1/2 c. goat cheese, crumbled--plus additional for sprinkling over the pasta
Preparation:
  1. In a skillet over medium/low heat, cook garlic, onion, salt, and pepper.  Stir until the onion is soft.  Add tomatoes and chicken broth; simmer until the liquid is reduced.  Stir in olives, parsley, and more salt and pepper to taste.  Reduce heat and keep the mixture warm.
  2. In a small pot, bring water to a boil, add salt and pasta shells.  Cook until al dente and drain, reserving 1/3 cup of the cooking water.  Add pasta shells to skillet and lightly toss.
  3. In a small bowl, whisk 1/2 ounce of goat cheese with reserved cooking water until the cheese is melted and the mixture is smooth.  Add cheese "sauce" to the skillet with pasta and toss to mix all the ingredients together.
  4. Transfer pasta to a serving dish and sprinkle with the additional goat cheese.  Serve immediately.
Recipe and link:  http://withstyleandgraceblog.com/2012/08/01/gluten-free-pasta-with-sun-dried-tomatoes-olives/

Week 40: Recipe #1--Avocado Egg Salad

Mmmm...this egg salad was SO good!  Plus it was super easy to make.  We had a bunch of eggs and I wanted to use them up, so I hard boiled them.  I was going to make regular egg salad, and then I ran into this recipe.  It comes from a site called (Never) Homemaker (see link below).  Not sure I'll have regular egg salad again!  We had these in wraps, but I had some the next day over some romaine lettuce--great lunch!  This will definitely be a staple in our house.  I served these wraps with fresh fruit.  Makes 2-3 wraps, so I doubled it.
You'll Need:
  • 4 hard-boiled eggs
  • 1 large avocado, cubed
  • 2 Tbslp. mayonnaise or vegenaise (I used regular mayonnaise)
  • 1 tsp. curry or fenugreek powder (I used curry powder)
  • pinch of salt and pepper
Preparation:

Combine all the ingredients in a large bowl and mash together with a fork.  Adjust the salt/pepper/mayo to your tastes.  

Monday, September 10, 2012

Week 39: Recipe #5--Mini Mexican Pizzas

These little pizzas were a big hit with my girls.  I found these on a site called Dashing Dish (see link below).  These are supposed to be a healthier version of the mexican pizza at Taco Bell.  I didn't really see them that way, but they were good.  I served these "pizzas" with spanish rice and a green salad.  Makes 12 pizzas.
You'll Need:
  • 3-4 large whole wheat tortillas, or enough to cut out 12 small circles
  • 1 c. lean ground turkey, cooked
  • 1/2 c. salsa 
  • 2 tsp. dry taco seasoning
  • lowfat refried beans
  • lowfat shredded mexican blend cheese
  • optional toppings:  sliced black olives, shredded lettuce, lowfat sour cream, chopped tomatoes
Preparation:
  1. Preheat oven to 425 degrees.  Spray a 12-count muffin tin with nonstick cooking spray.
  2. Start by laying each tortilla out individually on a flat surface, and use an empty can, glass cup, or cookie cutter to cut 3-4 medium circles out of each wrap.
  3. Press each wrap circle into muffin tin using your fingers.
  4. Meanwhile, in a small bowl, mix together the ground meat, salsa, taco seasoning, and refried beans.  Stir until well combined.
  5. Scoop 1/8th cup meat mixture into each cup.
  6. Top with shredded cheese (dividing evenly between each pizza) and olives, if desired.
  7. Bake in preheated oven for 12-15 minutes, or until cheese is melted.
  8. Wait for mini mexican pizzas to cool, and remove from muffin tin using a fork or knife.  
  9. Serve with desired toppings.
Recipe and link:  http://dashingdish.com/recipe/mini-mexican-pizzas/

Week 39: Recipe #4--Summer Vegetables with Sausage and Potatoes

This recipe comes from skinnytaste.com (see link below).  I love recipes where I can use lots of summer vegetables, so this was perfect!  I wasn't a huge fan of the sausage, but the rest of the meal was great!  I might substitute it next time for another type of meat, or possibly just make it vegetarian and use it as a side dish.  I served this with a green salad and fruit.  Makes 4 servings.
You'll Need:
  • 1 lb. baby red potatoes, cut in half or quartered
  • 2 tsp. oil
  • 1/2 tsp. garlic powder
  • 1 tsp. kosher salt
  • fresh cracked pepper
  • 14 oz. Italian chicken sausage, sliced 1-inch thick
  • 1 large onion, chopped
  • 4-5 cloves garlic, smashed with the side of the knife
  • 1/2 orange bell pepper, diced 1-inch squares
  • 1/2 yellow bell pepper, diced 1-inch squares
  • 1 red bell pepper, diced 1-inch squares
  • 2 Tblsp. fresh rosemary, or other fresh herb such as thyme
  • 2 c. zucchini, 1/2-inch thick and quartered
Preparation:
  1. Place oil and potatoes in a large, deep nonstick skillet with a tight fitting lid on high heat; season with garlic powder, salt, and pepper.  When the skillet gets hot and starts to sizzle, reduce heat to low and cook with a tight lid on for about 20-25 minutes, shaking the pan occasionally to prevent the potatoes from burning.  Remove from heat and let them sit 5 minutes without removing the lid.  Set potatoes aside on a dish.
  2. Add the sausage to the skillet and saute on medium-low and cook, stirring occasionally until browned but not quite cooked through, about 10 minutes.  Season chopped vegetables with salt and pepper.  Add onions, peppers, garlic, and rosemary to the skillet and mix.  Continue cooking, stirring occasionally until onions and peppers become slightly browned.  Add zucchini and cook an additional 5 minutes, mixing as it cooks until cooked through.
  3. Return the potatoes back to the skillet and mix well.  Adjust salt and pepper as needed; cover and cook 5 more minutes.
Recipe and link:  http://www.skinnytaste.com/2012/07/summer-vegetables-with-sausage-and.html

Week 39: Recipe #3--Slow Cooker Beef Brisket over Garlic Parmesan Mash

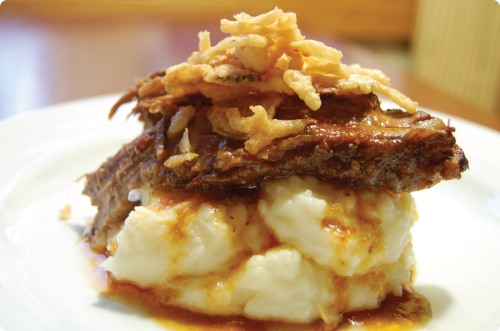
I found this recipe on Pinterest.  It is from a site called Haute Apple Pie (see link below).  It turned out really tender and was great over the mashed potatoes.  My girls loved it, too.  I regret that I forgot to buy the french fried onions, but would like to try that next time...the added texture would be nice.  I also didn't have a red lager on hand, so I looked online and saw that you could substitute chicken or beef broth for beers in recipes.  I used chicken broth.  I served this meal with green beans and fruit.  Makes 6-8 servings.
Photo from hauteapplepie.com
You'll Need:
  • 2 Tblsp. vegetable oil
  • 1 3-4 lb. beef brisket
  • 2 cloves garlic, peeled and roughly chopped
  • 1 12 oz. bottle red lager (I substituted chicken broth)
  • 4 stalks celery, cut into large pieces
  • 2/3 c. brown sugar
  • 1 can tomato paste
  • 1/2 c. apple cider vinegar
  • 1/4 c. brown mustard
  • 1/3 c. worcestershire sauce
  • 1/2 tsp. paprika
  • dash of coarse ground black pepper
  • 5-6 med. russet potatoes, peeled and cut into chunks
  • 1/2 c. milk
  • 2 Tblsp. butter or margarine
  • 1 tsp. garlic salt
  • 1/2 c. shredded parmesan cheese
Preparation:
  1. Heat vegetable oil in a large skillet.  Brown brisket on all sides, about 8-10 minutes.  Add garlic half way through.  Transfer meat to slow cooker.  Pour beer in skillet, scraping up brown bits.  Simmer for one minute.  Add to the slow cooker.  Nestle celery around beef.
  2. In a medium bowl, add remaining ingredients and whisk.  Pour over beef.  Cook on low for 8 hours.  Remove from cooker and allow to sit about 10 minutes before cutting.
  3. Mashed potatoes:  In a large pot, cover potatoes with water and bring to a boil.  Boil approximately 20 minutes.  Drain water.  Add remaining ingredients and whip with hand mixer.
Recipe and link:  http://hauteapplepie.com/2010/10/15/slow-cooker-beef-brisket-over-garlic-parmesan-mash/

Friday, August 31, 2012

Week 39: Recipe #2--Baked Tacos

This is a great way to make tacos for a large group of people, plus they were really good.  These were super easy to make, and were pretty quick, too.  I found this recipe on Pinterest, and it comes from a site called Blog Chef (see link below).  I served these tacos with some spanish rice and watermelon.  Makes 20 tacos.
Photo from blogchef.net
You'll Need:
  • 2 lbs. ground beef
  • 4 tsp. dried minced onion
  • 3 tsp. chili powder
  • 1 tsp. cornstarch
  • 1 tsp. garlic powder
  • 1 tsp. ground cumin
  • 1/2 tsp. dried oregano
  • 1/8 tsp. cayenne pepper
  • 1 (8 oz.) can tomato sauce
  • 1 (16 oz.) can refried beans
  • 2 c. shredded colby-jack cheese
  • 20 hard taco shells
  • optional garnishes:  sour cream, salsa, tomatoes, avocado, lettuce
Preparation:
  1. Preheat oven to 400 degrees.
  2. In a small bowl combine onion, chili powder, cornstarch, garlic powder, cumin oregano, and cayenne pepper.  Mix well and set aside.
  3. In a large skillet, brown ground beef over med-high heat.  Drain off any excess liquid.  Add refried beans, tomato sauce, and prepared taco seasoning.  Mix well.
  4. Spoon the taco meat mixture into the taco shells and place into a 13 x 9 inch baking dish, standing up.  (I had to also use an 8 x 8 to fit all 20 tacos.)  Sprinkle cheese over the top of the taco meat in each shell.  Place into the oven for 10-12 minutes or until the cheese has melted and the tacos are heated through.  Remove from the oven and top with any additional garnishes for serving.
Recipe and link:  http://blogchef.net/baked-tacos-recipe/

Week 39: Bonus Dessert!--Chocolate Crunch Brownies

These are by far my FAVORITE brownies.  I got this recipe when I was in college from my roommate, and make them only once in a blue moon.  They are very good, but can be very addicting.  I made them this week for a girls' night, so I thought I'd share the recipe here.  Makes 36 servings.  (They are extremely rich, so you can cut them pretty small).
Photo from www.tasteofhome.com
You'll Need:
  • 1 c. butter, softened
  • 2 c. sugar
  • 4 eggs
  • 1/2 c. baking cocoa
  • 1 1/2 c. all-purpose flour
  • 2 tsp. vanilla extract
  • 1/2 tsp. salt
  • 1 jar (7 oz.) marshmallow creme
  • 1 c. creamy peanut butter
  • 12 oz. bag semi-sweet chocolate chips
  • 3 c. rice krispies
Preparation:
  1. Preheat oven to 350 degrees.
  2. Cream butter and sugar until light and fluffy in a large bowl.  Beat in eggs and vanilla.  Then add the cocoa, flour, and salt.  Mix until well-blended.
  3. Spread into a greased 13 x 9 in. baking pan.  Bake for about 25-30 minutes.  Cool in pan on a wire rack.  When brownies are cool, spread marshmallow creme over the top of them.
  4. In a small saucepan, melt peanut butter and chocolate chips over low heat, stirring constantly until smooth.  Remove from heat and stir in the rice krispies.  Spread this mixture over top of the marshmallow.  Refrigerate until set and then cut into bars.
**I think these taste best cold, so I keep them refrigerated and serve them straight from the fridge.


Week 39: Recipe #1--Million Dollar Spaghetti

This is another one of those baked spaghetti recipes (I've got others similar to it posted as well).  They are all a bit different, and my family loves them, so I'll keep trying them as I come across them.  This one is from a blog called Being Grown Up (see link below), and it was pretty good.  I think I missed the crunch of the french fried onions atop the last one I made (Spaghetti Casserole with French Fried Onions).   Plus, this one used a whole stick of butter, which seemed a bit excessive, but it was tasty.  I served it with a green salad and some green beans.  Makes 8 servings.
Photo from ashleykaitlin.blogspot.com
You'll Need:
  • 1 lb. ground beef
  • 1 jar spaghetti sauce
  • 8 oz. cream cheese, softened
  • 1/4 c. sour cream
  • 1/2 lb. cottage cheese
  • whole stick of butter
  • 8 oz. noodles, cooked
  • bag of sharp cheddar cheese
Preparation:
  1. Preheat oven to 350 degrees.
  2. Mix cream cheese, sour cream, and cottage cheese in a bowl.  Set aside.
  3. Brown the ground beef and drain.  Pour spaghetti sauce over the beef and stir together.
  4. Take a few slices of the butter and put them in the bottom of the casserole dish (13 x 9).  
  5. Layer half of the noodles in the bottom of the dish.  Pour the cream cheese mixture on top of the noodles and spread it all over.  Then add the remaining noodles and put some more slices of butter on top of that.  Pour on the meat mixture and spread.
  6. Bake in the oven for 30 minutes.  When it's done, take the dish out and put the cheddar cheese on top.  Place it back in the oven for 15 minutes.  Enjoy!
Recipe and link:  http://ashleykaitlin.blogspot.com/2011/01/million-dollar-spaghetti.html

Wednesday, August 22, 2012

Week 38: Bonus Side Dish #3--Cuban/Mexican Grilled Corn

This corn was AMAZING.  I've heard of this before and was always put off by the mayonnaise, but tonight I thought I'd give it a try.  So glad I did.  It's going to be hard to eat regular corn on the cob now.  I got this recipe from a site called The Ravenous Couple - Cooking Life Together (see link below).
Photo from theravenouscouple.com
You'll Need:
  • grated cotija cheese (can substitute queso fresco, Italian parmesan, or feta if you can't find it)
  • mayonnaise
  • ground cayenne chili powder
  • lime wedges
  • corn on the cob
Preparation:
  1. Peel of entire husk and place corn on the grill.  
  2. When corn is done, start by brushing on the mayonnaise.  Sprinkle desired amounts of cotija cheese and cayenne powder.  Finish with a squeeze of lime.  YUM!
Recipe and link:  http://www.theravenouscouple.com/2009/05/cubanmexican-grilled-corn.html

Week 38: Recipe #5--Enfrijoladas

This recipe comes from the Tasty Kitchen blog (see link below), and it was pretty tasty.  My girls really loved it.  It's also super easy to put together, which was great considering it was my first day back to work tonight.  I served these with spanish rice and Cuban/Mexican Grilled Corn (which was also AMAZING).  Great dinner!  Makes 4 servings.
Photo from Tasty Kitchen Blog
You'll Need:
  • 4 c. refried beans
  • 1 c. vegetable stock
  • 1 c. water
  • 1 Tblsp. tomato paste
  • 6-8 whole small or medium sized tortillas 
  • 3 c. shredded monterey jack cheese
Preparation:
  1. Preheat oven to 350 degrees.
  2. Heat up the refried beans in a large pan.  Add in the vegetable stock, water, and tomato paste and blend until smooth.  You want the sauce to be very thin, so add more liquid if necessary.  If the sauce is too thick it will weigh down the tortillas and tear them.  
  3. Using tongs, take a tortilla and dip in the sauce.  You want them to soak through enough that they are pliable and won't tear, but if you soak them for too long they'll come apart when you lift them out.
  4. Lay the tortilla dipped in bean sauce flat in a small baking dish.  Sprinkle some cheese on one side of the tortilla, and then fold it in half like a quesadilla.  Repeat this with each tortilla until the baking dish is full.  Pour the remainder of the bean sauce into the pan and sprinkle with remaining cheese.
  5. Bake for about 10 to 15 minutes, or until the cheese has melted.
Recipe and link:  http://tastykitchen.com/blog/2012/05/enfrijoladas/

Week 38: Bonus Side Dish #2--Summer Vegetable Tian

This was SO good!  We all loved it and will definitely be making this again soon.  It will be a permanent side dish fixture in our house.  I found this recipe on Pinterest, and it comes from a blog called Budget Bytes (see link below).  Try it soon!
Photo from Budget Bytes
You'll Need:
  • 1 Tblsp. olive oil
  • 1 med. yellow onion
  • 1 tsp. minced garlic
  • 1 med. zucchini
  • 1 med. yellow squash
  • 1 med. potato
  • 1 med. tomato
  • 1 tsp. dried thyme
  • salt and pepper, to taste
  • 1 c. shredded Italian cheese
Preparation:
  1. Preheat oven to 400 degrees.  Finely dice the onion and mince the garlic.  Saute both in a skillet with olive oil until softened (about five minutes).
  2. While the onion and garlic are sauteing, thinly slice the res of the vegetables.
  3. Spray the inside of an 8 x 8 square or round baking dish with nonstick spray.  Spread the softened onion and garlic in the bottom of the dish.  Place the thinly sliced vegetables in the baking dish vertically, in an alternating pattern.  Sprinkle generously with salt, pepper, and thyme.
  4. Cover the dish with foil and bake for 30 minutes.  Remove the foil, top with cheese, and bake for another 15-20 minutes or until the cheese is golden brown.
Recipe and link:  http://budgetbytes.blogspot.com/2011/08/summer-vegetable-tian-660-recipe-110.html

Week 38: Recipe #4--Neely's Pigs in a Blanket with a Tangy Dipping Sauce

These were great, and the kids gobbled them up!  I found this recipe on the Food Network website (see link below).  They were the perfect size for the kids and my husband loved them, too.  Not the healthiest menu option, but it was a fun dinner night.  I did serve these with baked veggies and fresh fruit, so all in all--great meal.  These would make great appetizers, too!  Makes 24 mini pigs.
Photo from foodnetwork.com
You'll Need:
  • 1 (8 oz.) can original crescent dough
  • 1/4 c. dijon mustard
  • 20 mini hot dogs or cocktail franks
  • 1 egg, lightly beaten
  • poppy seeds or sesame seeds (I used sesame)
  • 1/2 c. sour cream
  • 1/2 c. mayonnaise
  • 3 Tblsp. dijon mustard
  • 1 Tblsp. whole-grain mustard
Preparation:
  1. Preheat the oven to 350 degrees.
  2. Cut each triangle of crescent roll dough into thirds lengthwise, making 3 small strips from each roll.
  3. Brush the dough strips lightly with dijon mustard.  Put the mini dogs on one end of the dough and roll up.
  4. Arrange them, seam side down, on a greased cookie sheet.  Brush with egg wash and sprinkle with poppy seeds or sesame seeds.  Bake until golden brown, about 12 to 15 minutes.  Serve warm with the dipping sauce.
  5. For the tangy dipping sauce, mix the last 4 ingredients (sour cream to whole-grain mustard) in a bowl.  Cover with plastic wrap and refrigerate until serving.  Can be made a day ahead.
Recipe and link:  http://www.foodnetwork.com/recipes/patrick-and-gina-neely/neelys-pigs-in-a-blanket-recipe/index.html

Saturday, August 18, 2012

Week 38: Recipe #3--Crockpot Ravioli Casserole

This recipe comes from a blog called Becoming Betty (see link below).  It was really easy to put together, especially since I didn't brown the beef with the onion and garlic first.  I put frozen beef in with everything else, all at once (except for the last four ingredients, which get put in the last 30 minutes).  The house smelled wonderful when we got home, and it tasted great, too.  I served this with a green salad and green beans.  Makes 6-8 servings.
Photo from Becoming Betty
You'll Need:
  • 1 1/2 lbs. lean ground beef
  • 1 onion, chopped
  • 1 clove garlic, minced
  • 1 can (15 oz.) tomato sauce
  • 1 can (15 oz.) stewed tomatoes (I used the Italian kind)
  • 1 tsp. oregano
  • 1 tsp. Italian seasoning
  • salt and pepper, to taste
  • 10 oz. pkg. frozen spinach, thawed (could use fresh as well)
  • 16 oz. bowtie pasta, cooked
  • 1/2 c. parmesan cheese, shredded
  • 1 1/2 c. mozzarella, shredded
Preparation:
  1. Brown ground beef with onion and garlic.  (I just put the beef, onion, and garlic in the crockpot along with the other ingredients.  The beef was frozen; the casserole turned out great--much easier than the extra step of browning it.)  Put in the crockpot and add sauce, tomatoes, and seasonings.
  2. Cook for 6-7 hours on low.  Add the last 4 ingredients during the last 30 minutes of cooking, mix really well, and turn crockpot to high.  
Recipe and link:  http://becomingbetty.blogspot.com/2011/03/crock-pot-ravioli-casserole.html

Wednesday, August 15, 2012

Week 38: Bonus Side Dish Recipe #1--Balsamic Roasted Red Potatoes

YUM, these were good.  I will be making these again soon.  I found this recipe on Pinterest and it comes from a site called The Baking Beauties (see link below).
Photo from The Baking Beauties
You'll Need:
  • 2 Tblsp. olive or canola oil
  • 2 lbs. small red potatoes, quartered
  • 1 Tblsp. finely chopped green onion
  • 6 garlic cloves, minced
  • 1 tsp. dried thyme
  • 1 tsp. dried rosemary, crushed
  • 1/8 tsp. ground nutmeg
  • 1/4 c. balsamic vinegar
  • 3/4 tsp. salt
  • 1/4 tsp. pepper
Preparation:
  1. In a large nonstick skillet, heat oil over medium-high heat.  Add the potatoes, onion, and garlic; toss to combine.  Add the thyme, rosemary, and nutmeg; toss well.  Cook and stir for 2-3 minutes or until potatoes are hot.
  2. Transfer to a 15-inch x 10-inch x 1-inch baking pan coated with nonstick cooking spray.  Bake at 400 degrees for 25-30 minutes or until potatoes are golden and almost tender.  Add the vinegar, salt, and pepper; toss well.  Bake 5-8 minutes longer or until potatoes are tender.
Recipe and link:  http://www.thebakingbeauties.com/2008/11/balsamic-roasted-red-potatoes.html

Week 38: Recipe #2--Slow Cooker Turkey Loaf

I found this recipe on Skinny Ms. (see link below).  I made it while staying at my parents, but didn't have my laptop (where I'd bookmarked the recipe), so I had to try and make it from memory...and I forgot a lot.  Turned out okay, but a little too well done.  I'd definitely try this again though (with the recipe in front of me), because it's super easy to throw together.  I served this with Balsamic Roasted Red Potatoes and green beans.  Makes 4-6 servings.
Photo from skinnyms.com
You'll Need:
  • 1 lb. lean ground turkey 
  • 1 egg, slightly beaten
  • 1/2 c. diced yellow onion (I forgot to add this and the bell pepper, but would next time)
  • 1/2 c. sweet red bell pepper
  • 1 c. whole grain bread crumbs, or whole wheat panko
  • kosher and sea salt, to taste
  • 1/2 tsp. black pepper
  • 1 tsp dried oregano
  • 1/3 c. barbecue sauce (I used Trader Joe's)
  • 1/3 c. ketchup
Preparation:
  1. In a large bowl combine all the above ingredients, except ketchup, and mix well.  Lightly spray the bottom and sides of the slow cooker with nonstick cooking spray.  Shape mixture into a loaf and place in the slow cooker.  (To help remove the meatloaf from the crockpot after cooking, tear two pieces of aluminum foil, about 3-4", fold in half lengthwise and place crisscross underneath the meatloaf prior cooking.)
  2. Cover and cook on low for 6-8 hours.  Add ketchup to the top about 30 minutes before the end of cooking time.  
Recipe and link:  http://skinnyms.com/slow-cooker-turkey-loaf/

Saturday, August 11, 2012

Week 38: Recipe #1--Grilled Pasta Packets

I found this recipe on the Tasty Kitchen blog (see link below).  Loved it!  My 20 month old ate almost a whole packet by herself!  It was a hit with the whole family.  This would be a great thing to bring for camping, but the backyard grill works well, too.  I followed the recipe pretty closely, and it was super easy to make.  I served these packets with a green salad and fresh fruit.  Makes 6 packets.
Photo from Tasty Kitchen blog
You'll Need:
  • 1 lb. whole grain spaghetti noodles, cooked for about 6 minutes or slightly less than al dente per package instructions
  • 6 whole roma tomatoes, seeded and chopped
  • 1 c. fresh basil leaves, coarsely chopped (I used dried, about a tablespoon)
  • 1/2 tsp. salt
  • 1/4 tsp. black pepper
  • 3 garlic cloves, finely chopped
  • 3 Tblsp. olive oil
  • 1 whole lemon, cut into 6 wedges
  • 4 oz. goat cheese (I used goat cheese crumbles)
Preparation:
  1. Preheat grill to medium heat.
  2. Cut one dozen 8 x 12" pieces of aluminum foil.  Layer foil so that you are using 2 per packet.  In a bowl, toss together pasta, chopped tomato, basil, salt, pepper, garlic, and olive oil.  Spoon one serving of pasta mixture (about 1 1/4 cups, although I did have some extra left over) into the center of each packet.
  3. Bring long edges of foil together, then roll it up to secure it.  Roll edges of packet to form a closed space (do not squeeze out all of the air).
  4. Reduce grill heat to low, then place packets on grill.  Cook for 10-12 minutes, shaking packets halfway through cooking.
  5. Remove from grill and serve immediately.
Recipe and link:  http://tastykitchen.com/blog/2012/07/grilled-pasta-packets/?utm_source=feedburner&utm_medium=feed&utm_campaign=Feed%3A+TastyKitchenBlog+%28Tasty+Kitchen+Blog%29

Thursday, July 12, 2012

Week 37: Recipe #5--Cheesy Vegetable Chowder

I found this recipe on Pinterest, and it comes from a blog called Lulu the Baker (see link below).  Even though it was super hot outside today, I made this soup and it was GOOD.  I followed the recipe, except I used a crockpot instead of cooking it on the stove.  I put the first seven ingredients in the crockpot on low at around 10:30 in the morning, and then about 30 minutes prior to eating dinner I added the last five.  Much easier to not have to worry about dinner, and it smelled good in the house when we came home from the park!  I served this soup with crackers and fruit.  Makes about 8 servings.
Photo from Lulu the Baker
You'll Need:
  • 2 Tblsp. butter
  • 1/2 c. chopped onion
  • 1 c. finely chopped carrot
  • 1 stalk celery, finely chopped (I added an extra stalk--we like celery)
  • 1 Tblsp. minced garlic
  • 4 c. chicken broth
  • 2 large baking potatoes, peeled and chopped
  • 1 Tblsp. flour
  • 1/2 c. water
  • 2/3 c. milk
  • 2 c. chopped broccoli (I used frozen to save on prep time)
  • 2 heaping cups shredded cheddar cheese (I might have used closer to 3...)
Preparation:
  1. Melt the butter in a large soup pot.  Add onions, carrots, and celery; saute over medium heat until  tender.  (I just threw all of these ingredients, plus garlic, broth, and potatoes, into the crockpot on low for a good 6 to 7 hours, then added the remaining ingredients 30 minutes prior to eating.)  Add garlic and cook 1 or 2 additional minutes.
  2. Add chicken broth and potatoes; bring to a boil and cook until potatoes are tender.  
  3. Mix flour with water, add, and simmer until soup is slightly thickened.  
  4. Add milk and broccoli and cook until broccoli is just tender and soup is heated through.  Stir in cheese, allow to melt, and serve.
Recipe and link:  http://luluthebaker.blogspot.com/2011/09/cheesy-vegetable-chowder.html

Tuesday, July 10, 2012

Week 37: Recipe #4--Skillet Lasagna

I found this recipe on a site called The Realistic Nutritionist (see link below).  It was really easy to throw together (in fact, my 4 yo helped me prepare it) and the whole family loved it.  It could also be easily adapted by adding meat, but it stands on its own without.  I left out the mushrooms (family preference) and used dried basil vs. fresh.  I also added some Italian seasoning for a bit more flavor.  I served this lasagna with green beans and fruit.  Makes 4 servings.
Photo from The Realistic Nutritionist
You'll Need:
  • 1 1/2 Tblsp. extra virgin olive oil
  • 1 large onion, chopped
  • 1 c. mushrooms (we left these out)
  • 2 garlic cloves, minced
  • 2 cans (14.5 oz each) Italian diced tomatoes, drained
  • 1/4 c. tomato sauce
  • 3 basil leaves, chopped (I used a tsp dried basil)
  • 1/4 tsp. black pepper
  • 1 tsp. sea salt
  • 1/2 c. skim ricotta cheese
  • 1/2 c. part skim mozzarella cheese
  • 3 Tblsp. parmesan cheese
  • about 6 oz. lasagna noodles, broken into thirds and fully cooked
  • 2 Tblsp. parsley, dried or fresh
Preparation:
  1. Heat oil in a large nonstick skillet over medium-high heat.  Add onions and cook until softened, about 4 minutes.  Add garlic and mushrooms and cook until garlic is fragrant, about one minute.  Add in diced tomatoes, tomato sauce, basil, salt, and pepper.  Cook mixture until it thickens up a bit, around 5 minutes.
  2. Add noodles to skillet and stir into mixture well.  Add scoops of ricotta cheese over the noodles; add in mozzarella and parmesan.  Stir in parsley.  Cook about 2 more minutes, or until mixture is thick.
  3. Serve immediately with additional basil or parsley.
Recipe and link:  http://nutritionfor.us/2012/02/eat-skinny-be-skinny-easy-peasy-skillet-lasagna/

Week 37: Recipe #3--Chicken Florentine Puffs

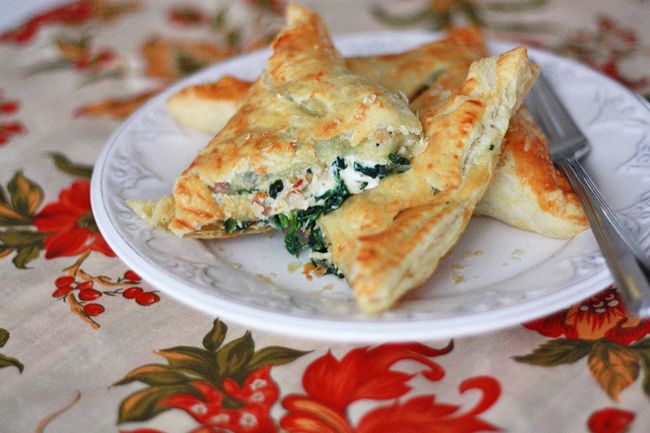
I found this recipe on Pinterest, and it comes from a site called One Lovely Life (see link below).  I've had a box of two puff pastry sheets in my freezer for a while, and needed something to do with them.  These were AMAZING.  So flavorful and tasty!  I will definitely be making these again.  I didn't change anything about the recipe--it's perfect as is!  I especially love recipes with chopped spinach, because my girls will both eat it even though it's good for them.  I served these with a tossed green salad and some fruit.  Makes 8 puffs.  (My husband and I had one puff each and, with the salad and fruit, were more than full.
Photo from www.onelovelylife.com
You'll Need:
  • 2 sheets puff pastry, thawed and rolled out
  • 2 c. cooked chicken, cubed or shredded (I used a rotisserie chicken)
  • 1 pkg. (10 oz.) frozen chopped spinach, thawed and liquid squeezed out
  • 1 roasted red pepper, diced
  • 4 oz. cream cheese, softened
  • 1 c. gruyere, grated
  • 2-3 Tblsp. fresh basil, or 2 tsp. dried (I used dried)
  • 1/4 tsp. garlic powder
  • 1/4 tsp. salt
  • 1/4 tsp. pepper
  • 1 egg
  • 1 Tblsp. water
  • optional:  parmesan cheese, for garnish
Preparation:
  1. In a large bowl, combine chicken, spinach, red pepper, cream cheese, gruyere, basil, garlic powder, salt, and pepper.  Toss until well combine and cream cheese is completely mixed in.
  2. Make an egg wash by beating egg with water.
  3. Roll out puff pastry.  Slice each sheet into 4 pieces (for 8 squares total).  Divide filling among the 8 squares.  For each puff, place filling in the center.  Brush the edge of one half with egg wash and fold in half diagonally to form a triangle.  Press down the edges with a fork to seal.  Brush the top of the puff with egg wash and sprinkle with a bit of fresh parmesan, if using.  Make 2-3 small slits in the top to allow steam to escape during baking.
  4. Place puffs on two baking sheets lined with parchment paper or sprayed with nonstick spray.  Parchment is recommended.
  5. Bake at 400 degrees for 15-18 minutes, or until golden.
**Note:  To re-heat frozen puffs:  place on baking sheet lined with parchment paper and bake at 400 degrees for 15-18 minutes, or until heated through.

Saturday, July 7, 2012

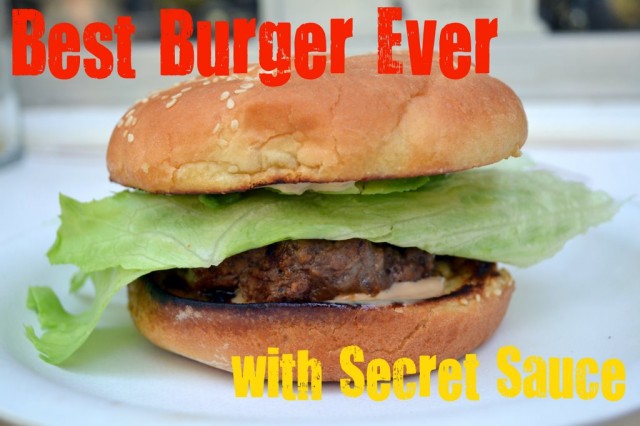
Week 37: Recipe #2--Best Burger Ever (with Secret Sauce)

"Best Burger Ever" is the name of this recipe on a site called Little Miss Momma (see link below).  I don't know if it in fact is the best burger ever, as I've never tried them all, but I will tell you it was pretty darn good.  My 4 year old ate her entire burger (granted it was a half-burger, but still...she generally eats very little).  It was also extremely easy to throw together.  I followed the directions exactly, and it yielded about 6 burgers.  I served these burgers with corn on the cob and fresh fruit.  Yum!
Photo from www.littlemissmomma.com
You'll Need:
  • 2 lbs. ground beef 85/15
  • sesame seed buns
  • 1/2 c. grated monterey jack cheese
  • 1/4 c. BBQ sauce (Sweet Baby Ray's is recommended; had some on hand so that's what I used)
  • seasoned salt to taste
  • cracked black pepper to taste
  • onion powder to taste
  • 3/4 c. mayo
  • 1/4 c. ketchup
  • 1/4 c. relish
  • 2 Tblsp. worcestershire sauce
  • seasoned salt
Preparation:
  1. Combine the ground beef, grated cheese, bbq sauce, and seasonings.  Shape patties that are about 1 inch thick.
  2. Then, it is very important to push a 1/2 inch indent into the center of the patty--this is what prevents the patty from becoming a dome.  These burgers stay extra moist because the bbq sauce and cheese are mixed in with the meat.
  3. Wait for the skillet to get super hot and then apply a very thin layer of butter to the pan.  Place the patties on the pan, indent side up.
  4. Reduce heat to medium and allow this side of the patty to cook for about 4-6 minutes, but make sure it doesn't burn.  Then flip the burger over and cook until done.
  5. For the sauce:  Combine the last 5 ingredients (mayo thru seasoned salt) and whisk until well mixed.  Taste and adjust ingredients to your liking.
  6. Butter and toast the buns on a skillet.
  7. Assemble the burgers and serve with your choice of burger toppings.
Recipe and link:  http://www.littlemissmomma.com/2011/10/best-burger-ever-recipe-with-secret-sauce.html

Friday, July 6, 2012

Week 37: Recipe #1--Cream Cheese Chicken Enchiladas

I found this recipe on Pinterest.  It comes from a blog called Pearls, Handcuffs, & Happy Hour (see link below).  I really liked it and so did my husband, but the kids...not so much.  They love black beans, rice, chicken, tortillas, cheese, so I think it was the enchilada sauce that did them in.  At least my four year old said it was "too spicy".  I'm a wimp with spices, and it didn't bother me, plus it was a mild sauce, so I'm not sure why they didn't like it.  I would definitely make it again--but maybe use less sauce on a few of the enchiladas, or leave some of them untouched by sauce.  I served these with fresh berries--love summer!  Makes 4-6 servings.
Photo from Pearls, Handcuffs, & Happy Hour
You'll Need:
  • 2-3 chicken breasts (or a rotisserie chicken), cooked and shredded
  • 8 oz. cream cheese, softened
  • 1 can (28 oz.) green enchilada sauce
  • 1 can black beans, rinsed and drained
  • 2 c. cooked rice
  • tortillas
  • 1-2 cups shredded monterey jack and colby cheese
Preparation:
  1. Preheat the oven to 375 degrees.
  2. Mix the shredded chicken, cream cheese, and 2 cups of the enchilada sauce together.
  3. Pour half a cup of the enchilada sauce into the bottom of a 9 x 13 baking dish.
  4. On each tortilla, layer the rice and black beans to your taste, then top with the chicken mixture.  Roll each of the tortillas up and place them in the baking dish seam side down.
  5. Top with the remaining enchilada sauce and the shredded cheese.
  6. Cover the baking dish with foil and bake for about 25 minutes.  Uncover the enchiladas, turn on the broiler, and broil for about 3-5 minutes uncovered--just long enough to brown the cheese.
Recipe and link:  http://pearls-handcuffs-happyhour.blogspot.com/search/label/mexican?updated-max=2010-11-09T16:17:00-08:00&max-results=20


Thursday, July 5, 2012

Week 36: Recipe #5--Patriotic Pigs in a Blanket

I found this recipe on a blog called Kitchen Fun With My 3 Sons (see link below).  Cute idea for the 4th of July.  They turned out great and my 4 year old loved them.  I served these with fresh fruit and chips.
Photo from Kitchen Fun With My 3 Sons
You'll Need:
  • hot dogs
  • crescent rolls
  • 1 egg
  • 1 tsp. water
  • blue food coloring
  • wooden skewers
  • any white block cheese (I used monterey jack)
Preparation:
  1. Preheat the oven to 350 degrees.
  2. Beat 1 egg with 1 teaspoon of water.  Take the crescent rolls out of the package and unroll them. Cut each roll into 3 strips and cut off the pointed ends.
  3. Take the strips and wrap around the hot dog.  Spread the wrapped dough with the egg wash.  Squeeze 4 to 5 drops of blue food coloring in a small bowl.  Brush the food coloring on the top half of the crescent so you have strips of red (hot dog), white (crescent), and blue (food colored crescent).  I followed these directions, but I think next time I'd do the egg wash and food coloring prior to wrapping the crescent strips around the hot dog.  Seems like it'd be easier that way.
  4. Place on a baking sheet and put in the oven for 8 minutes or until lightly tan in color.
  5. Push the wooden skewer in the middle of the hot dog and poke it through the top.  Cut thick slices of your block cheese and then cut out stars with a star cookie cutter.  Didn't have one, so I used a knife and did it free hand.  Poke the stars on the top of the stick.
Recipe and link:  http://kitchenfunwithmy3sons.blogspot.com/

Monday, July 2, 2012

Week 36: Recipe #4--Italian Chicken

This is a crockpot recipe that I found on Pinterest.  It comes from a site called Crock-a-doodle-do (see link below).  I liked this recipe because it was super easy to throw together, and it was pretty tasty, too. I put the chicken in the crockpot frozen, and it was done in about 8 hours on low.  The seasoning was really good, and there was plenty leftover for lunches the next day.  I served this with green beans and fruit.  Makes 4-6 servings.
Photo from Crock-a-doodle-do
You'll Need:
  • 4-6 boneless, skinless chicken breasts (frozen works, too!)
  • 16 oz. bottle of Italian dressing (I used lite)
  • 1/2 c. of parmesan cheese
  • Italian seasoning
  • 4-6 potatoes scrubbed and cut in half or wedges (I didn't peel, but you could)
  • 1/2 bag of mini carrots
Preparation:
  1. Spray crockpot with Pam.
  2. Squirt a small amount of Italian dressing at the bottom of the crockpot.
  3. Place two chicken breasts in the crockpot.
  4. Pour some of the Italian dressing on the chicken.
  5. Sprinkle half the cheese onto the chicken.
  6. Sprinkle Italian seasoning onto the chicken.
  7. Place next two chicken breasts into the crockpot, if possible not directly on top of the first two.
  8. Sprinkle remaining cheese on top of chicken.
  9. Pour the carrots on top.
  10. Pour more of the Italian dressing on top of chicken and carrots.
  11. Place potatoes on top.
  12. Pour the remaining Italian dressing on the potatoes.  Sprinkle Italian seasoning on the potatoes.  Cook on low for 6-8 hours.
Recipe and link:  http://www.crockadoodledo.blogspot.com/2012/04/italian-chicken.html