Monday, May 23, 2011

Week 11: Recipe #5--Mexican Chicken and Rice

This recipe is from the Smitten With My Kitchen blog.  Another pretty simple one, plus mostly made with ingredients I already have.  A great last minute recipe.  I served this with a green salad and fruit.
Photo from Smitten With My Kitchen blog
You'll Need:
  • 1 egg, beaten
  • 2 cups cooked, cubed chicken (you could use 1 rotisserie chicken--that's what I did)
  • 1 small onion, chopped
  • 1 Tblsp. olive oil
  • 2 garlic cloves, minced
  • 2 cups cooked white rice
  • 1 can corn, drained
  • 1 can (15 oz.) black beans rinsed and drained
  • 1 jar (7 oz.) roasted red peppers, drained and sliced
  • 1 can (8 oz.) enchilada sauce
  • cilantro, tortillas, salad, tortilla chips, sour cream (optional)
Preparation:
  1. In a large skillet scramble egg and cook until set.  Remove and set aside.
  2. In the same skillet saute chopped onion and garlic until onions are softened.  Stir in chicken, rice, beans, peppers, corn, and enchilada sauce; cook until heated through.  Stir in reserved egg.
  3. You can top with some minced cilantro if desired.
Recipe and link:  http://smittenwithmykitchen.blogspot.com/2011/05/mexican-chicken-and-rice.html

    Week 11: Recipe #4--Blazy's Pepperoni Studded Lasagna

    This recipe is from Guy Fieri on the Food Network website (see link below).  I have never made one of his recipes before, but thought I would try this one, given my husband's obsession with pepperoni.  Lily likes it too, so this is a win-win at our house.  I served this with VEGGIES, seeing as it was pretty heavy.
    Photo from foodnetwork.com
    You'll Need:
    • 2 pounds lasagna sheets
    • 2 cups hand cut 1/8-inch slices pepperoni (Not buying the pre-cut WAS actually better)
    • 4 cups tomato sauce, recipe follows below (You can buy tomato sauce if you are short on time, but this recipe is really good and can be made ahead)
    • 1 pound ricotta
    • 16 oz. shredded mozzarella
    • 2 pounds bulk Italian sausage, cooked
    • 3/4 cup grated parmesan
    Preparation:
    1. Preheat oven to 375 degrees.
    2. Boil 6 quarts of water, add a pinch of salt, and cook pasta to almost done.  Remove from water and shock in ice bath.
    3. In medium saucepan add pepperoni and saute over medium heat until crispy.  Remove from heat and drain on a paper towel.
    4. In a 10 by 14 inch baking dish (I used a 13 x 9), pour one cup of tomato sauce in bottom and around sides.  Layer lasagna sheets on the bottom of the pan, overlapping by 1/2 inch.  Add 1/3 amount of ricotta, 1/3 amount of mozzarella, 1/3 amount of sausage, then sprinkle generously with parmesan, add 1/2 cup tomato sauce, and 1/4 cup of pepperoni.  Repeat this 2 more times.
    5. On the very top sheet, top with remaining ricotta, tomato sauce, mozzarella, pepperoni, and dust with parmesan.  Bake for approximately 45 minutes.  Remove from oven; let sit for 15 minutes.  Cut and serve immediately.
    Tomato Sauce:
    • 3 oz. extra-virgin olive oil
    • 1 yellow onion, minced
    • 5 medium-sized garlic cloves, crushed
    • 6 cups skinned and diced Roma tomatoes
    • 2 Tblsp. thinly sliced fresh basil leaves
    • 1 Tblsp. minced fresh oregano leaves
    • salt and pepper
    In a medium saucepan, heat olive oil.  Add onion and cook over medium to low heat until transparent.  Add garlic and cook until almost brown.  Then add tomatoes and cook for 1/2 hour over low to medium heat.  Add the basil and oregano and continue to cook for another 1/2 hour.  Season, to taste, with salt and pepper, cool and store in the fridge until ready to use. 

    Week 11: Recipe #3--Crockpot Bean and Cheese Burrito Casserole

    This crockpot recipe is from the blog, A Year of Slow Cooking.  It's a simple and tasty recipe; the only downside is that it's only 6-7 hours to cook on low, and that's if you have a 4-quart slow cooker.  If you have a larger one you have to reduce the cooking time by a few hours.  So, it's probably not a recipe to make if you are working all day.  I was able to make it when my husband had the day off, so he could put in the ingredients at the right time.  I served it with Spanish rice and fruit.
    Photo from A Year of Slow Cooking blog
    You'll Need:

    • 1 small onion, peeled and diced
    • 1 green bell pepper, seeded and chopped
    • 2 cans (14.5 oz. each) diced tomatoes, undrained
    • 1 can (4 oz.) roasted green chiles, undrained
    • 1 tsp. garlic powder
    • 1/2 tsp. chili powder
    • 1/4 tsp. ground cumin
    • 8 flour tortillas
    • 4 cups cooked pinto beans (three 15-oz. cans, drained)
    • 4 cups shredded Mexican blend cheese
    • optional garnishes:  sour cream, sliced avocado, etc.
    Preparation:

    1. In a mixing bowl, stir together the onion, bell pepper, tomatoes, chiles, and spices.
    2. Put a layer of tortillas into the bottom of your cooker--you may need to tear them a bit to get good coverage.  Add a scoop of the onion/tomato mixture and layer on a healthy spoonful of beans and then a layer of cheese.  Repeat layers until you've run out of ingredients.  Top with a healthy dose of cheese.
    3. Cover and cook on low for 6 to 7 hours (if using a 6-qt, do 3 to 4 hours on low, then click it over to warm--there's nothing really to cook--you're just heating thoroughly and getting the cheese to get that yummy crust).
    4. Top with desired garnishes.
    Recipe and link:  http://crockpot365.blogspot.com/2011/05/bean-and-cheese-burrito-casserole-slow.html?utm_source=feedburner&utm_medium=feed&utm_campaign=Feed%3A+AYearOfCrockPotting+%28A+Year+of+Slow+Cooking%29

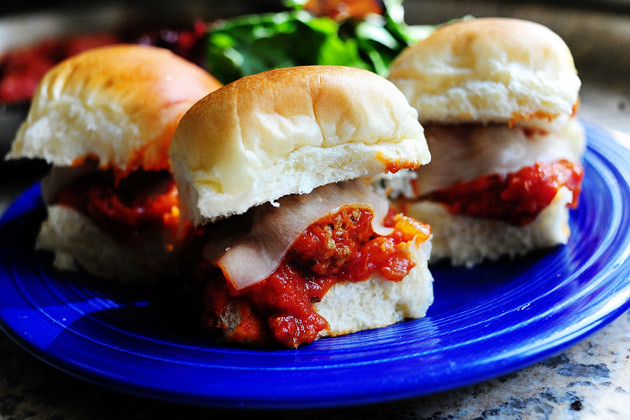
    Week 11: Recipe #2--Mini Meatball Sandwiches

    Here is another yummy Pioneer Woman recipe (see link below).  Very simple, and who doesn't love a meatball sandwich???  Plus, they're so tiny and cute!  I served this with a green salad.
    Photo from Pioneer Woman
    You'll Need:
    • 1 pound ground beef
    • 1/2 cup Panko or other bread crumbs
    • 1 clove garlic, minced
    • 1/2 tsp. salt
    • freshly ground black pepper, to taste
    • 1/2 cup milk
    • 2 Tblsp. olive oil
    • 1/2 medium onion, diced
    • 1 jar (large) marinara sauce
    • 12 whole dinner rolls (or slider rolls)
    • 4 slices provolone cheese, cut into four wedges each
    Preparation:
    1. Mix meat with bread crumbs, garlic, salt, pepper, and milk.  Knead together with hands.  Roll into heaping tablespoon-sized rolls.
    2. Heat olive oil in a large skillet over medium heat.  Add onions and cook for one minute.  Add meatballs between the onions and brown for one minute.  (You might have to do this in two batches, depending on the size of your skillet.)
    3. Pour in jar marinara; shake pan gently to mix.  Put on lid and allow to simmer for 20 minutes.
    4. When ready to serve, cut each dinner roll in half.  Place a wedge of provolone on the top and bottom of each roll.  Spoon a meatball with the sauce on to the bottom bun; top with the top bun.
    5. Serve immediately!
    Recipe and link:  http://thepioneerwoman.com/cooking/2010/07/16-minute-meal-3-mini-meatball-sandwiches/

    Week 11: Recipe #1--Spanish Style Tuna Cakes

    This is a Rachel Ray recipe that I recently found on her magazine website (see link below).  I like it because it has very few ingredients (most of which I already have in my pantry), and it's pretty quick and easy to make.  Plus, it's one of those things I never would have thought to make--it's different, but tasty.  I served this with fruit and bread.
    Photo from Rachel Ray
    You'll Need:

    • Two 5-oz. cans tuna, drained
    • 1/2 cup Italian breadcrumbs
    • 1/3 cup chopped pimiento-stuffed spanish olives, 1 Tblsp. olive juice reserved
    • 1/4 cup raisins
    • 1 egg, beaten
    • 2 Tblsp. finely chopped red onion
    • 1 tsp. ground cumin
    • salt and pepper, to taste
    • 1/4 cup extra virgin olive oil
    • 1 package mixed lettuce
    Preparation:

    1. In a large bowl, combine the tuna, breadcrumbs, olives, raisins, egg, onion, and cumin; season with salt and pepper.  Form into 4 patties.
    2. In a large skillet, heat 2 tablespoons olive oil over medium heat.  Add the patties and cook, turning once, until golden, about 8 minutes.
    3. Meanwhile, in a large bowl, whisk together the remaining 2 tablespoons olive oil and the olive juice; season with salt and pepper.  Add the lettuce and toss to coat.  Serve the tuna cakes on the salad.
    Recipe and link:  http://www.rachaelraymag.com/recipes/rachael-ray-magazine-recipe-search/budget-recipes/Spanish-Style-Tuna-Cakes

    Friday, May 20, 2011

    Week 10: Recipe #5--Oktoberfest: German Brats and Pomme Frites

    WARNING:  This is not a quick meal to make.  Nor is it very health-conscious.  However, it is extremely good.  This is a favorite meal of mine that my friend Mark makes.  Soooooooooooo tasty!  I love the curry ketchup; vital to this recipe.  If you can't find it at your local grocery store, it's worth hunting down.  Mark usually serves this with a fruit salad, to add something healthy to this not-so-healthy meal.

    You'll Need:
    • potatoes (use 1-2 pounds per person), cut into fries
    • vegetable oil
    • salt and pepper, to taste
    • Oktoberfest sausages
    • hoagie buns
    • curry ketchup (we buy ours at a European store here in Salem; I buy 2 kinds--Heinz and Hela)
    • curry powder
    • regular ketchup
    Preparation:
      1. Put the cut fries in a large pot filled with cold water and ice.  Put in the refrigerator for several hours.
      2. When you are ready to start the fries (and you will need to start early, especially if you are making a lot), then heat up the oil on high in a large pot; it will take a long time.  While it is heating up, you'll need to take out the fries and pat them dry on paper towels or dish towels.  You want them to be pretty dry when you put them in the oil.  
      3. When you notice that the oil is really hot (somewhat moving around) you can begin putting fries in.  Not too much at a time.  Turn the heat down a bit between medium and medium-high.  Now I was really tempted to constantly be checking them and poking at them, but Mark had to remind me to LEAVE THEM ALONE.  You'll want to cook them so they just slightly begin to brown.  You don't want to pull them out soggy, but you don't want them fully cooked either.  It's a fine line that took me a few times to master.  You will be frying them a second time right before eating them, so this is just the first round.
      4. When taking them out, put them on a paper towel. After you have finished all of the fries, you can start on the brats.
      5. Cut the brats lengthwise almost in half, so that you can unfold them but they are not in two pieces.  Lay them flat on a griddle at 375 degrees (or you could use an outside grill) and baste them with a combination of the following:  ketchup, the two curry ketchups, and curry powder.  Adjust the amounts to your taste preferences.  Flip them over and baste the other side as well.  Cook until the sausages are done.
      6. As the sausages are cooking, you can fry the fries one more time until cooked.  I like mine crispy.  As you take them out, put them on a cookie sheet.  Sprinkle them with salt and pepper.  Place in the oven at 200 degrees to keep them warm, especially if you won't be eating them right away.  
      7. Toast the hoagie buns and spread the curry ketchup mixture on them as well.  Put in the sausages, grab a handful of fries, and enjoy!
      ***Mark also serves a traditional German drink that is made of one part Coke and one part Fanta.  He says that's the true way to enjoy this meal.  Personally, I don't like to drink my calories...plus there are enough in here as is!


      Monday, May 16, 2011

      Week 10: Recipe #4--Mexican Flatbread Pizza

      I got this recipe from the Pioneer Woman last summer.  I searched for it recently and couldn't find it on her site again, so I don't have a link.  It is pretty tasty, has simple ingredients, and kids like it.  It does have quite a few steps which, though not difficult, can take some time.  I usually serve this with spanish rice and fruit.

      You'll Need:

      • 1 can large biscuits (non-flaky, 8 biscuits per can)
      • 1 can refried beans
      • 3 Tblsp. salsa or picante sauce
      • 1 1/2 cups grated cheddar cheese
      • pico de gallo
      • 2 cups cooked ground beef, seasoned to taste (I usually add taco seasoning)
      • shredded iceberg lettuce
      • 3 Tblsp. salsa
      • 5 Tblsp. sour cream
      • cilantro for garnish
      Preparation:

      1. Preheat oven to 375.  Flour work surface and roll out each biscuit until very flat.  Brush very lightly with olive oil.  Bake for 8 minutes, or until starting to turn golden.  Remove from oven and set aside.
      2. Mix refried beans with salsa.  Heat on stovetop.
      3. Heat up cooked ground beef.
      4. To assemble, spread refried beans over each flatbread.  Top with plenty of beef.  Sprinkle shredded cheddar over the top.  Return to oven for 3 minutes, or until melted and bubbly.  Top with plenty of pico de gallo and lettuce.
      5. Mix together salsa and sour cream.  Drizzle over the top of each pizza.  Garnish with cilantro.  Cut into wedges and serve immediately.

      Week 10: Recipe #3--Tuna Noodle Casserole

      I found this Rachel Ray recipe online (see link and recipe below).  I have used other tuna noodle casseroles I like a bit more, but this one is extremely easy and fast to make.  I served this with fruit.
      Photo from Rachel Ray

      You'll Need:

      • 1 (10 3/4 oz.) can condensed cream of mushroom soup
      • 1/2 cup milk
      • 2 tablespoons chopped pimientos (optional) 
      • 1 cup frozen peas
      • 2 cans (about 6 oz. each) tuna, drained
      • 2 cups medium egg noodles, cooked and drained
      • 2 Tblsp. dry bread crumbs
      • 1 Tblsp. butter, melted
      Preparation:

      1. Preheat oven to 400.  Stir the soup, milk, pimientos, peas, tuna, and noodles in a 1 1/2 quart casserole.  Stir the bread crumbs and butter in a small bowl.
      2. Bake the tuna mixture for 20 minutes or until hot and bubbly.  Stir the tuna mixture.  Sprinkle with the bread crumb mixture.
      3. Bake for 5 minutes or until the bread crumb mixture is golden brown.
      Recipe and link:  http://www.rachaelraymag.com/recipes/Tuna-Noodle-Casserole

      Week 10: Recipe #2--Coconut Curry Chicken

      Another recipe from my sister, Katie.  So tasty!  It does require chicken masala, which isn't found at all grocery stores.  I was able to find it at a local Indian store.  She serves this over rice with a side of steamed vegetables.

      You'll Need:

      • 1 to 1/2 pound boneless, skinless chicken breast, cut into cubes
      • vegetable oil
      • 1/2 onion, sliced
      • 1-2 cloves of garlic, minced, to taste
      • 1/2 tsp. crushed ginger
      • 1/2 tsp. tumeric powder
      • 1 Tblsp. chicken masala
      • 1/2 cup water
      • can of regular coconut milk (Katie says "Taste of Thai" brand is the best)
      • chopped cilantro
      • salt and pepper, to taste
      Preparation:

      1. Warm up the vegetable oil over medium heat.  Add the onions, garlic, and ginger.  Fry until onions are almost caramelized.  
      2. Add the tumeric and masala and stir.  Then add the chicken and mix together. Add in about 1/2 a cup of water.
      3. Cover and cook for 20 minutes, stirring occasionally.
      4. Add in the can of coconut milk.  Turn down the heat to low and mix all ingredients together.  Bring almost to a boil, then remove from heat.  (My sister's husband says not to let it boil, it will ruin the flavor of the coconut milk.)
      5. Sprinkle cilantro, salt, and pepper over the top to taste.  Serve over rice.

      Week 10: Recipe #1--Chicken Fajitas

      Okay....so I took one week off.  It was my birthday AND Mother's Day--I deserve a break, right???  This recipe is one that my sister gave me.  She's made it for me many times, so I thought it was about time to try it on my own.  I have made fajitas before, but I like her recipe the best.  She usually serves this with rice and beans, along with chips, guacamole, and salsa.  DELICIOUS!!!

      You'll Need:

      • 4 boneless, skinless chicken breasts, cut up into strips
      • 1/4 cup red wine vinegar 
      • 1/4 cup vegetable oil
      • 1 tsp. oregano
      • 1 tsp. chili powder
      • 2 cloves garlic, minced
      • 1 tsp. sugar
      • 1/2 tsp. salt
      • 1/4 tsp. pepper
      • 1 red bell pepper, remove seeds and membranes, cut into strips
      • 1 green bell pepper, remove seeds and membranes, cut into strips
      • 1 onion, thickly sliced
      Preparation:

      1. Marinade:  mix chicken, red wine vinegar, vegetable oil, oregano, chili powder, garlic, sugar, salt, and pepper.  Marinate for 24 hours.
      2. Saute bell peppers and onion together with salt and pepper (to taste) until soft.  
      3. Add chicken in with juices.  Heat until chicken is cooked through.
      4. Serve in warmed flour tortillas.
      Sunday, May 1, 2011

      Week 9: Recipe #5--Slowcooker Hawaiian BBQ Pulled Chicken Sandwiches

      This recipe is from the Tasty Kitchen blog (see link below).  It's an EXTREMELY simple crockpot recipe, plus it's nice to switch it up from the usual pork to chicken.  I served this with fruit and coleslaw.
      Photo from Tasty Kitchen blog

      You'll Need:

      • 3 pounds boneless chicken breast, thighs, or a combo of the two (I used breast meat)
      • 1 whole onion (large), sliced into chunks
      • 1 can (20 oz.) pineapple, drained--see note below***, nibblits or crushed is recommended
      • 1 bottle (18 to 20 oz.) BBQ sauce
      • hamburger or kaiser buns
      Preparation:

      1. Place your chicken in the bottom of the crockpot.  Top with onions, then  pineapple.  Pour the entire bottle of BBQ sauce over the whole thing.  ***If you want a sweeter BBQ, add up to half a cup of the pineapple juice you drained, depending on how sweet you want it.
      2. Turn your crockpot on LOW and cook for 8-10 hours (or on HIGH for 4-6).
      3. An hour or two before it is finished cooking, carefully remove the chicken from the crockpot and shred it using two forks.  Place chicken back in the crockpot and stir well to combine.  Finish cooking an additional hour or two so the chicken can absorb most of the sauce.  Serve on hamburger buns and top with coleslaw if desired.  (We eat our coleslaw on the side.)
      Recipe and link:  http://thepioneerwoman.com/tasty-kitchen/recipes/main-courses/hawaiian-bbq-pulled-chicken-sandwiches/

      Week 9: Recipe #4--Springy Shells

      The Pioneer Woman blog is a lifesaver.  This was a lot of veggies to try and get Lily (and my husband) to eat.  However, I think it actually turned out okay.  Lily did pick out the things she liked from it and passed on other parts, but I like to expose her to lots of different veggies several times in the hopes she'll like them someday.  I served this with fruit and bread.
      Photo from Pioneer Woman
      You'll Need:

      • 16 oz. weight pasta shells (medium), or other short pasta (I used the shells)
      • 1 pound asparagus, cut into 1 1/2 inch pieces; discard tough pieces
      • 1/2 pound broccoli, cut into small florets
      • 1/2 pound zucchini (about 1 medium zucchini), diced
      • 1/2 cups frozen peas
      • 3 whole green onions, sliced (white and light green parts)
      • 3 cloves garlic, minced
      • 4 Tblsp. butter
      • 2 Tblsp. olive oil
      • 20 oz. weight ricotta cheese 
      • 1/2 tsp. salt
      • 2 eggs
      • 1 1/2 cup parmesan cheese
      • black pepper, to taste
      • extra olive oil for drizzling
      Preparation:

      1. Preheat oven to 350 degrees.  Cook pasta until extremely al dente--with still quite a bit of bite.
      2. Melt butter with the olive oil over medium-low to medium heat, then add in the garlic.  Add the asparagus to the pan and cook for five minutes.  Sprinkle in a little salt.
      3. Add the broccoli and cook for one minute, then add the zucchini and cook for one or two more minutes.  Add the frozen peas, stir together then turn off the heat.  Set aside.
      4. In a separate bowl, mix the ricotta, eggs, salt, and pepper until well combined.
      5. To assemble:  butter a 9 x 13 inch baking dish.  Add half the pasta, then spread 1/3 cup of the ricotta mixture over the surface.  Sprinkle 1/3 of the parmesan over the ricotta, then 1/2 of the vegetables.  Repeat with the rest of the pasta, the rest of the ricotta, and another 1/3 of the parmesan.  End with the rest of the veggies and the rest of the parmesan.
      6. Drizzle with a couple of tablespoons olive oil, then bake for 25 minutes on 350 degrees or until nice and hot.
      Recipe and link:  http://thepioneerwoman.com/cooking/2009/06/springy-shells/

      Week 9: Recipe #3--Stuffed Bell Peppers

      I found this recipe on the Tasty Kitchen blog (see link below).  I've always wanted to try stuffed bell peppers, and they were actually pretty tasty; similar to mini-meatloaves.  I think Lily enjoyed eating out of a pepper (anything to make dinner fun, right?).  I served this with a fruit and bread.

      You'll Need:

      • 4 whole green or red bell peppers (I used green)
      • 4 Tblsp. olive oil
      • 1 whole medium sweet onion, chopped
      • 2 cloves garlic, minced
      • 1 pound lean ground beef
      • 3/4 cup raw instant rice
      • 1 can (15 oz.) canned diced tomatoes
      • 1/2 tsp. worcestershire sauce
      • 1 dash Tabasco, optional (I left this out)
      • 1 tsp. dried oregano
      • salt and pepper, to taste
      • 1 cup grated sharp cheddar cheese
      Preparation:

      1. Bring a large pot of water to a boil over high heat.  Meanwhile, cut tops off of the peppers and remove seeds and ribbing.
      2. Add salt to boiling water, then add peppers and boil, using a spoon to keep peppers completely submerged, until they become a brilliant green color (or red if red peppers) and their flesh is slightly softened, about 3 minutes.  Drain; set aside to cool.
      3. Preheat oven to 350 degrees.  Heat the oil in a large skillet over medium heat.  Add onions and garlic; cook, stirring often, until soft and translucent, about 5 minutes.  Remove skillet from heat.
      4. In a large bowl combine meat, rice, tomatoes, onion mixture, worcestershire, tabasco and oregano, then season generously with salt and pepper.  Mix well.
      5. Arrange peppers cut side up in an 8 x 8 baking dish, then stuff peppers with filling.  Top each pepper with grated sharp cheddar cheese.  Add 1/2 cup of water to the baking dish.  Place in oven and bake for 40-50 minutes (or longer, depending on how big the peppers are that you are stuffing).
      *****If cheese starts getting too brown, cover with foil.

      Recipe and link:  http://thepioneerwoman.com/tasty-kitchen/recipes/main-courses/stuffed-bell-peppers-4/

      Week 9: Recipe #2--Sour Cream Noodle Bake

      This was yet another Pioneer Woman favorite at our house.  It's a pretty simple one to make, considering some of her recipes have quite a few steps.  I served this with a green salad and some good bread.  Enjoy!
      Photo from Pioneer Woman

      You'll Need:

      • 1 1/4 pound ground chuck
      • 1 can (15 oz.) tomato sauce
      • 1/2 tsp. salt
      • freshly ground black pepper, to taste
      • 8 oz. weight egg noodles
      • 1/2 cup sour cream
      • 1 1/4 cup small curd cottage cheese
      • 1/2 cup sliced green onions
      • 1 cup grated sharp cheddar cheese
      Preparation:

      1. Preheat oven to 350 degrees.  Brown ground chuck in a large skillet.  Drain fat, then add tomato sauce, 1/2 teaspoon salt, and plenty of freshly ground black pepper.  Stir, then simmer while you prepare the other ingredients.
      2. Cook egg noodles until al dente.  Drain and set aside.
      3. In a medium bowl, combine sour cream and cottage cheese.  Add plenty of freshly ground pepper.  Add to noodles and stir.  Add green onions and stir.
      4. To assemble, add half of the noodles to a baking dish.  Top with half the meat mixture, then sprinkle on half the grated cheddar.  Repeat with noodles, meat, then a final layer of cheese.  Bake for 20 minutes, or until all cheese is melted.
      Recipe and link:  http://thepioneerwoman.com/cooking/2011/03/sour-cream-noodle-bake/

        Week 9: Recipe #1--Chicken Enchilada Casserole

        This is a simple casserole to make if you are short on time.  I found it on the Parents website (see link below).  Pretty simple; not very many ingredients.  That makes it easy to change up and make your own.  I usually serve this with rice and fruit.  Makes 10 servings.
        Photo from parents.com

        You'll Need:

        • 3 cups shredded, cooked chicken (I usually just shred a rotisserie chicken)
        • 1 packet (1.25 oz.) taco seasoning
        • 2 cups salsa verde
        • 9 fajita-sized flour tortillas
        • 1 can (15.5 oz.) refried beans, warmed in microwave
        • 8 oz. sour cream
        • 3 cups shredded cheddar cheese
        Preparation:

        1. Heat oven to 350.  Mix chicken, taco seasoning, 1/2 cup water and salsa verde in a skillet.  Simmer on medium heat for about 10 minutes.
        2. Coat 13 x 9 inch baking dish with nonstick cooking spray.  Cover bottom of pan with 3 flour tortillas, overlapping.  Pour half of the chicken mixture on the tortillas.  Cover with 3 more tortillas.  Spread with warm beans and the sour cream.
        3. Sprinkle half the cheese over the beans and sour cream, and cover with the remaining 3 tortillas.  Top with the remaining chicken mixture, followed by remaining cheese.  Bake at 350 degrees for 25 to 30 minutes, until bubbly.
        Recipe and link:  http://www.parents.com/recipe/casseroles/chicken-enchilada-casserole/