Thursday, July 12, 2012

Week 37: Recipe #5--Cheesy Vegetable Chowder

I found this recipe on Pinterest, and it comes from a blog called Lulu the Baker (see link below).  Even though it was super hot outside today, I made this soup and it was GOOD.  I followed the recipe, except I used a crockpot instead of cooking it on the stove.  I put the first seven ingredients in the crockpot on low at around 10:30 in the morning, and then about 30 minutes prior to eating dinner I added the last five.  Much easier to not have to worry about dinner, and it smelled good in the house when we came home from the park!  I served this soup with crackers and fruit.  Makes about 8 servings.
Photo from Lulu the Baker
You'll Need:
  • 2 Tblsp. butter
  • 1/2 c. chopped onion
  • 1 c. finely chopped carrot
  • 1 stalk celery, finely chopped (I added an extra stalk--we like celery)
  • 1 Tblsp. minced garlic
  • 4 c. chicken broth
  • 2 large baking potatoes, peeled and chopped
  • 1 Tblsp. flour
  • 1/2 c. water
  • 2/3 c. milk
  • 2 c. chopped broccoli (I used frozen to save on prep time)
  • 2 heaping cups shredded cheddar cheese (I might have used closer to 3...)
Preparation:
  1. Melt the butter in a large soup pot.  Add onions, carrots, and celery; saute over medium heat until  tender.  (I just threw all of these ingredients, plus garlic, broth, and potatoes, into the crockpot on low for a good 6 to 7 hours, then added the remaining ingredients 30 minutes prior to eating.)  Add garlic and cook 1 or 2 additional minutes.
  2. Add chicken broth and potatoes; bring to a boil and cook until potatoes are tender.  
  3. Mix flour with water, add, and simmer until soup is slightly thickened.  
  4. Add milk and broccoli and cook until broccoli is just tender and soup is heated through.  Stir in cheese, allow to melt, and serve.
Recipe and link:  http://luluthebaker.blogspot.com/2011/09/cheesy-vegetable-chowder.html

Tuesday, July 10, 2012

Week 37: Recipe #4--Skillet Lasagna

I found this recipe on a site called The Realistic Nutritionist (see link below).  It was really easy to throw together (in fact, my 4 yo helped me prepare it) and the whole family loved it.  It could also be easily adapted by adding meat, but it stands on its own without.  I left out the mushrooms (family preference) and used dried basil vs. fresh.  I also added some Italian seasoning for a bit more flavor.  I served this lasagna with green beans and fruit.  Makes 4 servings.
Photo from The Realistic Nutritionist
You'll Need:
  • 1 1/2 Tblsp. extra virgin olive oil
  • 1 large onion, chopped
  • 1 c. mushrooms (we left these out)
  • 2 garlic cloves, minced
  • 2 cans (14.5 oz each) Italian diced tomatoes, drained
  • 1/4 c. tomato sauce
  • 3 basil leaves, chopped (I used a tsp dried basil)
  • 1/4 tsp. black pepper
  • 1 tsp. sea salt
  • 1/2 c. skim ricotta cheese
  • 1/2 c. part skim mozzarella cheese
  • 3 Tblsp. parmesan cheese
  • about 6 oz. lasagna noodles, broken into thirds and fully cooked
  • 2 Tblsp. parsley, dried or fresh
Preparation:
  1. Heat oil in a large nonstick skillet over medium-high heat.  Add onions and cook until softened, about 4 minutes.  Add garlic and mushrooms and cook until garlic is fragrant, about one minute.  Add in diced tomatoes, tomato sauce, basil, salt, and pepper.  Cook mixture until it thickens up a bit, around 5 minutes.
  2. Add noodles to skillet and stir into mixture well.  Add scoops of ricotta cheese over the noodles; add in mozzarella and parmesan.  Stir in parsley.  Cook about 2 more minutes, or until mixture is thick.
  3. Serve immediately with additional basil or parsley.
Recipe and link:  http://nutritionfor.us/2012/02/eat-skinny-be-skinny-easy-peasy-skillet-lasagna/

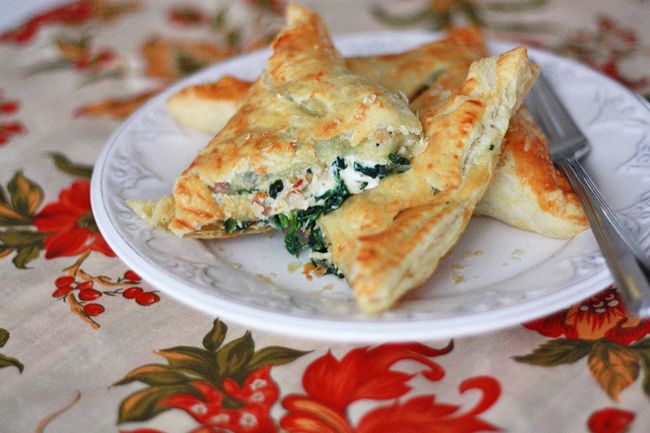
Week 37: Recipe #3--Chicken Florentine Puffs

I found this recipe on Pinterest, and it comes from a site called One Lovely Life (see link below).  I've had a box of two puff pastry sheets in my freezer for a while, and needed something to do with them.  These were AMAZING.  So flavorful and tasty!  I will definitely be making these again.  I didn't change anything about the recipe--it's perfect as is!  I especially love recipes with chopped spinach, because my girls will both eat it even though it's good for them.  I served these with a tossed green salad and some fruit.  Makes 8 puffs.  (My husband and I had one puff each and, with the salad and fruit, were more than full.
Photo from www.onelovelylife.com
You'll Need:
  • 2 sheets puff pastry, thawed and rolled out
  • 2 c. cooked chicken, cubed or shredded (I used a rotisserie chicken)
  • 1 pkg. (10 oz.) frozen chopped spinach, thawed and liquid squeezed out
  • 1 roasted red pepper, diced
  • 4 oz. cream cheese, softened
  • 1 c. gruyere, grated
  • 2-3 Tblsp. fresh basil, or 2 tsp. dried (I used dried)
  • 1/4 tsp. garlic powder
  • 1/4 tsp. salt
  • 1/4 tsp. pepper
  • 1 egg
  • 1 Tblsp. water
  • optional:  parmesan cheese, for garnish
Preparation:
  1. In a large bowl, combine chicken, spinach, red pepper, cream cheese, gruyere, basil, garlic powder, salt, and pepper.  Toss until well combine and cream cheese is completely mixed in.
  2. Make an egg wash by beating egg with water.
  3. Roll out puff pastry.  Slice each sheet into 4 pieces (for 8 squares total).  Divide filling among the 8 squares.  For each puff, place filling in the center.  Brush the edge of one half with egg wash and fold in half diagonally to form a triangle.  Press down the edges with a fork to seal.  Brush the top of the puff with egg wash and sprinkle with a bit of fresh parmesan, if using.  Make 2-3 small slits in the top to allow steam to escape during baking.
  4. Place puffs on two baking sheets lined with parchment paper or sprayed with nonstick spray.  Parchment is recommended.
  5. Bake at 400 degrees for 15-18 minutes, or until golden.
**Note:  To re-heat frozen puffs:  place on baking sheet lined with parchment paper and bake at 400 degrees for 15-18 minutes, or until heated through.

Saturday, July 7, 2012

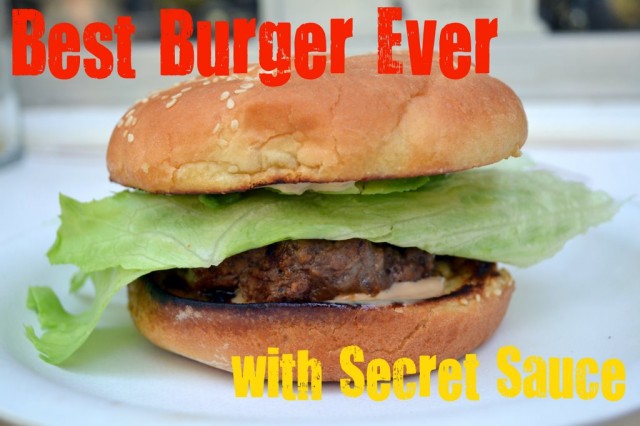
Week 37: Recipe #2--Best Burger Ever (with Secret Sauce)

"Best Burger Ever" is the name of this recipe on a site called Little Miss Momma (see link below).  I don't know if it in fact is the best burger ever, as I've never tried them all, but I will tell you it was pretty darn good.  My 4 year old ate her entire burger (granted it was a half-burger, but still...she generally eats very little).  It was also extremely easy to throw together.  I followed the directions exactly, and it yielded about 6 burgers.  I served these burgers with corn on the cob and fresh fruit.  Yum!
Photo from www.littlemissmomma.com
You'll Need:
  • 2 lbs. ground beef 85/15
  • sesame seed buns
  • 1/2 c. grated monterey jack cheese
  • 1/4 c. BBQ sauce (Sweet Baby Ray's is recommended; had some on hand so that's what I used)
  • seasoned salt to taste
  • cracked black pepper to taste
  • onion powder to taste
  • 3/4 c. mayo
  • 1/4 c. ketchup
  • 1/4 c. relish
  • 2 Tblsp. worcestershire sauce
  • seasoned salt
Preparation:
  1. Combine the ground beef, grated cheese, bbq sauce, and seasonings.  Shape patties that are about 1 inch thick.
  2. Then, it is very important to push a 1/2 inch indent into the center of the patty--this is what prevents the patty from becoming a dome.  These burgers stay extra moist because the bbq sauce and cheese are mixed in with the meat.
  3. Wait for the skillet to get super hot and then apply a very thin layer of butter to the pan.  Place the patties on the pan, indent side up.
  4. Reduce heat to medium and allow this side of the patty to cook for about 4-6 minutes, but make sure it doesn't burn.  Then flip the burger over and cook until done.
  5. For the sauce:  Combine the last 5 ingredients (mayo thru seasoned salt) and whisk until well mixed.  Taste and adjust ingredients to your liking.
  6. Butter and toast the buns on a skillet.
  7. Assemble the burgers and serve with your choice of burger toppings.
Recipe and link:  http://www.littlemissmomma.com/2011/10/best-burger-ever-recipe-with-secret-sauce.html

Friday, July 6, 2012

Week 37: Recipe #1--Cream Cheese Chicken Enchiladas

I found this recipe on Pinterest.  It comes from a blog called Pearls, Handcuffs, & Happy Hour (see link below).  I really liked it and so did my husband, but the kids...not so much.  They love black beans, rice, chicken, tortillas, cheese, so I think it was the enchilada sauce that did them in.  At least my four year old said it was "too spicy".  I'm a wimp with spices, and it didn't bother me, plus it was a mild sauce, so I'm not sure why they didn't like it.  I would definitely make it again--but maybe use less sauce on a few of the enchiladas, or leave some of them untouched by sauce.  I served these with fresh berries--love summer!  Makes 4-6 servings.
Photo from Pearls, Handcuffs, & Happy Hour
You'll Need:
  • 2-3 chicken breasts (or a rotisserie chicken), cooked and shredded
  • 8 oz. cream cheese, softened
  • 1 can (28 oz.) green enchilada sauce
  • 1 can black beans, rinsed and drained
  • 2 c. cooked rice
  • tortillas
  • 1-2 cups shredded monterey jack and colby cheese
Preparation:
  1. Preheat the oven to 375 degrees.
  2. Mix the shredded chicken, cream cheese, and 2 cups of the enchilada sauce together.
  3. Pour half a cup of the enchilada sauce into the bottom of a 9 x 13 baking dish.
  4. On each tortilla, layer the rice and black beans to your taste, then top with the chicken mixture.  Roll each of the tortillas up and place them in the baking dish seam side down.
  5. Top with the remaining enchilada sauce and the shredded cheese.
  6. Cover the baking dish with foil and bake for about 25 minutes.  Uncover the enchiladas, turn on the broiler, and broil for about 3-5 minutes uncovered--just long enough to brown the cheese.
Recipe and link:  http://pearls-handcuffs-happyhour.blogspot.com/search/label/mexican?updated-max=2010-11-09T16:17:00-08:00&max-results=20


Thursday, July 5, 2012

Week 36: Recipe #5--Patriotic Pigs in a Blanket

I found this recipe on a blog called Kitchen Fun With My 3 Sons (see link below).  Cute idea for the 4th of July.  They turned out great and my 4 year old loved them.  I served these with fresh fruit and chips.
Photo from Kitchen Fun With My 3 Sons
You'll Need:
  • hot dogs
  • crescent rolls
  • 1 egg
  • 1 tsp. water
  • blue food coloring
  • wooden skewers
  • any white block cheese (I used monterey jack)
Preparation:
  1. Preheat the oven to 350 degrees.
  2. Beat 1 egg with 1 teaspoon of water.  Take the crescent rolls out of the package and unroll them. Cut each roll into 3 strips and cut off the pointed ends.
  3. Take the strips and wrap around the hot dog.  Spread the wrapped dough with the egg wash.  Squeeze 4 to 5 drops of blue food coloring in a small bowl.  Brush the food coloring on the top half of the crescent so you have strips of red (hot dog), white (crescent), and blue (food colored crescent).  I followed these directions, but I think next time I'd do the egg wash and food coloring prior to wrapping the crescent strips around the hot dog.  Seems like it'd be easier that way.
  4. Place on a baking sheet and put in the oven for 8 minutes or until lightly tan in color.
  5. Push the wooden skewer in the middle of the hot dog and poke it through the top.  Cut thick slices of your block cheese and then cut out stars with a star cookie cutter.  Didn't have one, so I used a knife and did it free hand.  Poke the stars on the top of the stick.
Recipe and link:  http://kitchenfunwithmy3sons.blogspot.com/

Monday, July 2, 2012

Week 36: Recipe #4--Italian Chicken

This is a crockpot recipe that I found on Pinterest.  It comes from a site called Crock-a-doodle-do (see link below).  I liked this recipe because it was super easy to throw together, and it was pretty tasty, too. I put the chicken in the crockpot frozen, and it was done in about 8 hours on low.  The seasoning was really good, and there was plenty leftover for lunches the next day.  I served this with green beans and fruit.  Makes 4-6 servings.
Photo from Crock-a-doodle-do
You'll Need:
  • 4-6 boneless, skinless chicken breasts (frozen works, too!)
  • 16 oz. bottle of Italian dressing (I used lite)
  • 1/2 c. of parmesan cheese
  • Italian seasoning
  • 4-6 potatoes scrubbed and cut in half or wedges (I didn't peel, but you could)
  • 1/2 bag of mini carrots
Preparation:
  1. Spray crockpot with Pam.
  2. Squirt a small amount of Italian dressing at the bottom of the crockpot.
  3. Place two chicken breasts in the crockpot.
  4. Pour some of the Italian dressing on the chicken.
  5. Sprinkle half the cheese onto the chicken.
  6. Sprinkle Italian seasoning onto the chicken.
  7. Place next two chicken breasts into the crockpot, if possible not directly on top of the first two.
  8. Sprinkle remaining cheese on top of chicken.
  9. Pour the carrots on top.
  10. Pour more of the Italian dressing on top of chicken and carrots.
  11. Place potatoes on top.
  12. Pour the remaining Italian dressing on the potatoes.  Sprinkle Italian seasoning on the potatoes.  Cook on low for 6-8 hours.
Recipe and link:  http://www.crockadoodledo.blogspot.com/2012/04/italian-chicken.html